-
Notifications
You must be signed in to change notification settings - Fork 2
Firmware and flashing
Use the latest Arduino IDE + ESP8266 board manager 2.7.4 (3.XX is not supported as of yet)
https://github.com/khoih-prog/ESP8266TimerInterrupt
https://github.com/PaulStoffregen/Time
https://github.com/JChristensen/Timezone
NeoPixelBus (available in libraries manager)
ArduinoJson (available in libraries manager)
Modified SPI library - attached in the Libraries folder, copy this library to your Arduino libraries folder. Please note that if you don't copy the modified library, the sketch will still compile fine but it won't work correctly and cause crashes.
On line #25 of the sketch, uncomment the clock version you want to use. If you designed your own pcb, you will probably have to remap the segments to correct shift register pins (line #93 - #124).
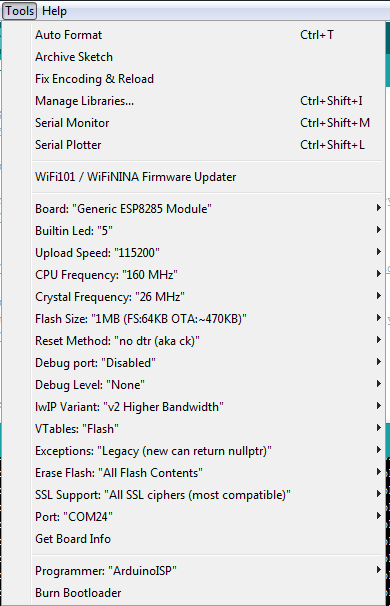
Since the clock is made for rapid development and has CH340 onboard, it's as easy as with nodemcu or D1 mini. Select correct port and use settings below (just select"reset method: DTR aka nodemcu" option in arduino IDE):

If you experience timeouts, use 115200 baud rate.
IMPORTANT: If you want your clock to be compatible with OTA updates, make sure to select Flash size: 1MB + 64k SPIFFS when flashing via USB no matter what flash size your ESP has. Choosing larger memory and later flashing via OTA will still work but you will loose your saved configuration.