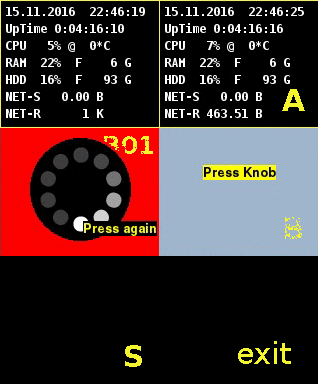
- Complete application to control tvheadserver and oscam servers
- Rotary switch test program
- pygame menu system based on a finite-state machine (FSM)
Note
In order to run any of the three above mentioned applications on the Raspberry PI hardware (RPI) it is necessary to install a rotary encoder knob / switch device and/or a LCD screen. Check the hardware part for details.
Note
Assumption: you use the newest jessie raspian version.
If not yet done install necessary python libraries:
-
transitions, a lightweight, object-oriented finite state machine implementation in Python
-
psutil
sudo apt-get install build-essential python-dev python-pip sudo pip install transitions sudo pip instal psutil
as the pi user run:
cd ~
clone https github://com.gevent/petervflocke/rotaryencoder_rpi menu
To start the local control app for tvheadend and oscam use command:
sudo python ~/menu/main.py
This can be started via ssh or directly on RPI
In this repository you can find two modules, which can be easily resused in other projects.
The RotaryEncoder.py module defines a class to handle operation of a 2-bit quadrature-encoded via interrupts and save the events in a queue to be proccess subsequently by a user application.
Doing this via interrupts with an event queue, dispenses us from a repetitive pooling of the current switch status and thus creates less timing requirement for the application end user interface loop. Interrupts approach to check the switch status reduce microprocessor load and eventually energy consumption.
In order to test your own rotary knob / switch, follow the hadware part - "Prepare rotary switch".
Assuming that you already cloned this github repository, the code is in menu folder, check the code of RotaryTest.py and correct, if neccessary used pins:
A_PIN  = 17 #wiring=0 A pin on rotary
B_PIN  = 27 #wiring=2 B pin on rotary
SW_PIN = 22 #wiring=3 press pin on rotary
Note
Use GPIO numbers BCM, not pin numbers or WiringPi numbers. For details refer to Wiring Pi
In the main loop
    try:
        while(True):
            print "waiting 5s"
            sleep (5)  # here you can process on RPI whatever you want and operate the rotary knob it won't be missed
            process()  # and check what has happened with rotary
    except KeyboardInterrupt:
        print "broken by keyboard"
during the 5 second sleep you can operate the switch as you like. All events are collected in a queue. The queue content and a respective action(s) can be processed in the process function.
def process():
    # this function can be called in order to decide what is happening with the switch
    while not(RotQueue.empty()):
        m=RotQueue.get_nowait()
        if m == RotaryEncoder.EventLeft:
            print "Detected one turn to the left"
            pass # add action for turning one to the left
        elif m == RotaryEncoder.EventRight:
            print "Detected one turn to the right"
            pass # add action for turning one to the left
        elif m == RotaryEncoder.EventDown:
            print "Detected press down"
            pass # add action for turning one to the left
        elif m == RotaryEncoder.EventUp:
            print "Detected release up"
            pass # add action for turning one to the left
            #exit()                   # uncomment to exit by "pressing the knob"
RotQueue.task_done()An example in the FSMTest.py provides a simple multiple screen pygame based menu system. In this module a finite-state machine (FSM) controls the logical flow of the screens and functions. The FSM simplifies the logic and can be tailored without huge code modification.
Having RotaryEncoder.py and a LCD Display integrated with the menu system provides a ready to use local "graphical" interface for any Raspberry PI application.
The FSMTest.py module can be also run without any modification on a regular PC (necessary python and python libraries have to be installed). This allows to develop and test the graphical interface without copying the code each time to the RPI. The cursor keys (Left, Right and Down) are used to "emulate" rotary switch behavior. The keys work also on RPI.
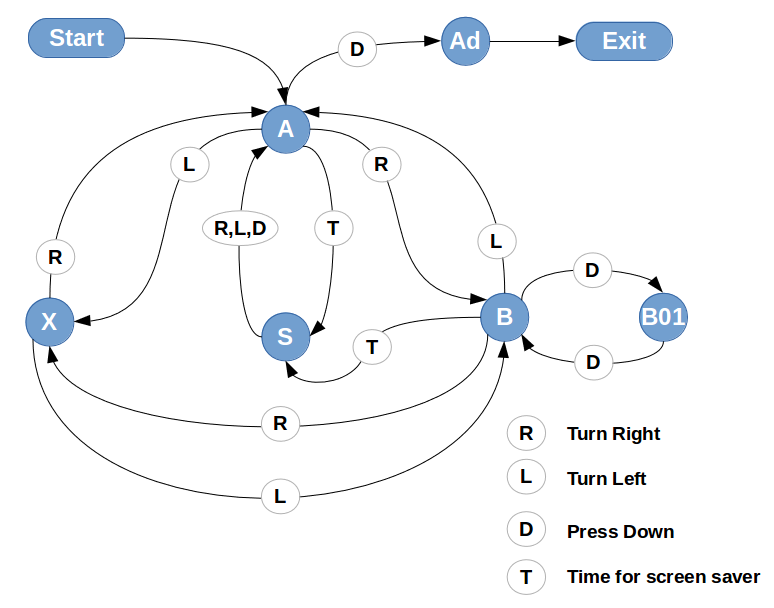
The floachart for the FSM in the menu example can be drawn like this:

This example and main menu application utilises a perfect FSM python implemenation. For details please refer to: https://github.com/tyarkoni/transitions#-transitions
The machine in the above example has 6 states
states = ['A', 'Ad', 'B', 'B01', 'X', 'S']where: A, B, X and S represents 4 states and each of them has own screen definition : AScreen, BScreen, XScreen, ScreenSaver accordingly. B01 is another state within BScreen where an animated spinner gif is displayed Ad is just an exit state where the application quits.
The transtions from state to state are defined as follow:
transitions = [
                   ['R',   'A',   'B'  ],   # turning knob right change from A to B
                   ['R',   'B',   'X'  ],   # turning knob right change from B to X
                   ['R',   'X',   'A'  ],   # turning knob right change from X to A (complete loop)
                   ['L',   'A',   'X'  ],   # turning knob left  change from A to X
                   ['L',   'X',   'B'  ],   # turning knob right change from X to B
                   ['L',   'B',   'A'  ],   # turning knob right change from B to A (complete loop)
                   ['D',   'B',   'B01'],   # pressing knob down in state B switch to B10
                   ['D',   'B01', 'B'  ],   # pressing knob down in state B10 switch to B
                   ['D',   'S',   'A'  ],   # press, turn left, right in screensaver leads always to the A state
                   ['D',   'A',   'Ad' ],   # press down the A state exits to Ad (state where the application exits)
                   ['R',   'S',   'A'  ],
                   ['L',   'S',   'A'  ],
                   ['T',   'A',   'S'  ],   # Screen saver works only in states A and B, for all other states (X, B01, Ad) cannot be activated
                   ['T',   'B',   'S'  ]
              ]
where R, L, D are the events / trigers from Rotary knob switch. T event / trigger is activated on an elapsed time defined for screen saver timeout.
The class Matter controlls switching pygame Screens, using transtion callbacks. Every transition has 'before' and 'after' attributes that contain a list of methods to call before and after the transition executes. Here an on_enter_StateName is used. StateName in this example can be A, B, X, S, Ad and B01.
    def on_enter_A(self, st):
        st.manager.change(AScreen(st.screen)) # switch to A Screen in pygame state manager
Each screen can have its own event handling if neccessary - for example to deal with check boxes, radio buttons, etc, located on this particular screen, or whatever the reason can be. For an example of a local event handling refer to XScreen class and the method: handle_events
All this together results in a sequence of screens you can switch by turning the rotary knob (or user keyboard cursor kyes) or change on other event e.g. screen timeout.
The main graphical application main.py, which controlls the tvheadend and oscam services, can be run as a pi user by:
sudo python ~/menu/main.py
or to leave the application running in bacground:
sudo python ~/menu/main.py > /dev/null 2>&1&
In the file settings.pyfollowing parameters can be configured:
        self.ScreenSize = (160,128)     # size of the lcd screen for pygame module
        self.ScrenSaverTime = 60        # timeout to activate the screeservers state (in seconds)

        # define 3 pins A/B + switc in BCM GPIO mode for the rotary encoder A/B Pin + Switch
        self.A_PIN  = 17 #wiring=0
        self.B_PIN  = 27 #wiring=2
        self.SW_PIN = 22 #wiring=3

        self.R_PIN  = 18 # wiring=1, relay to power external device

        # define daemons for services to be controlled
        self.TVProcname       = "tvheadend"       # name of the service, which will be checked via psutil on the process list to find out if the servise is up and running
        self.OscamProcname    = "oscam"           # same for oscam
        self.TVDaemonStart    = "/usr/bin/sudo /etc/init.d/tvheadend start"  # command to start the tvheadend service
        self.TVDaemonStop     = "/usr/bin/sudo /etc/init.d/tvheadend stop"   # command to stop the tvheadend service
        self.OscamDaemonStart = "/usr/bin/sudo /etc/init.d/oscam start"      # same for oscam
        self.OscamDaemonStop  = "/usr/bin/sudo /etc/init.d/oscam stop"
Check the comments for details.
