This is a program to cast your macOS audio, or Linux audio to your Google Cast devices.
It is written in Python, and it can stream via node.js, parec (Linux),
ffmpeg, or avconv. mkchromecast is capable of using lossy and lossless
audio formats provided that ffmpeg, avconv (Linux), or parec (Linux) are
installed. Additionally, a system tray menu is available.
By default, mkchromecast streams with node.js (or parec in Linux)
together with mp3 audio coding format at a sample rate of 44100Hz and
average bitrate of 192k. These defaults can be changed using the
--sample-rate and -b flags. It is useful to modify these parameters when
your wireless router is not very powerful, or in the case you don't want to
degrade the sound quality. For more information visit the
wiki, and the
FAQ.
For Linux, you can optionally install ffmpeg (or avconv) (more
information here). Note
that sometimes the lag between playing a song and hearing may be up to
8 seconds for certain backends.
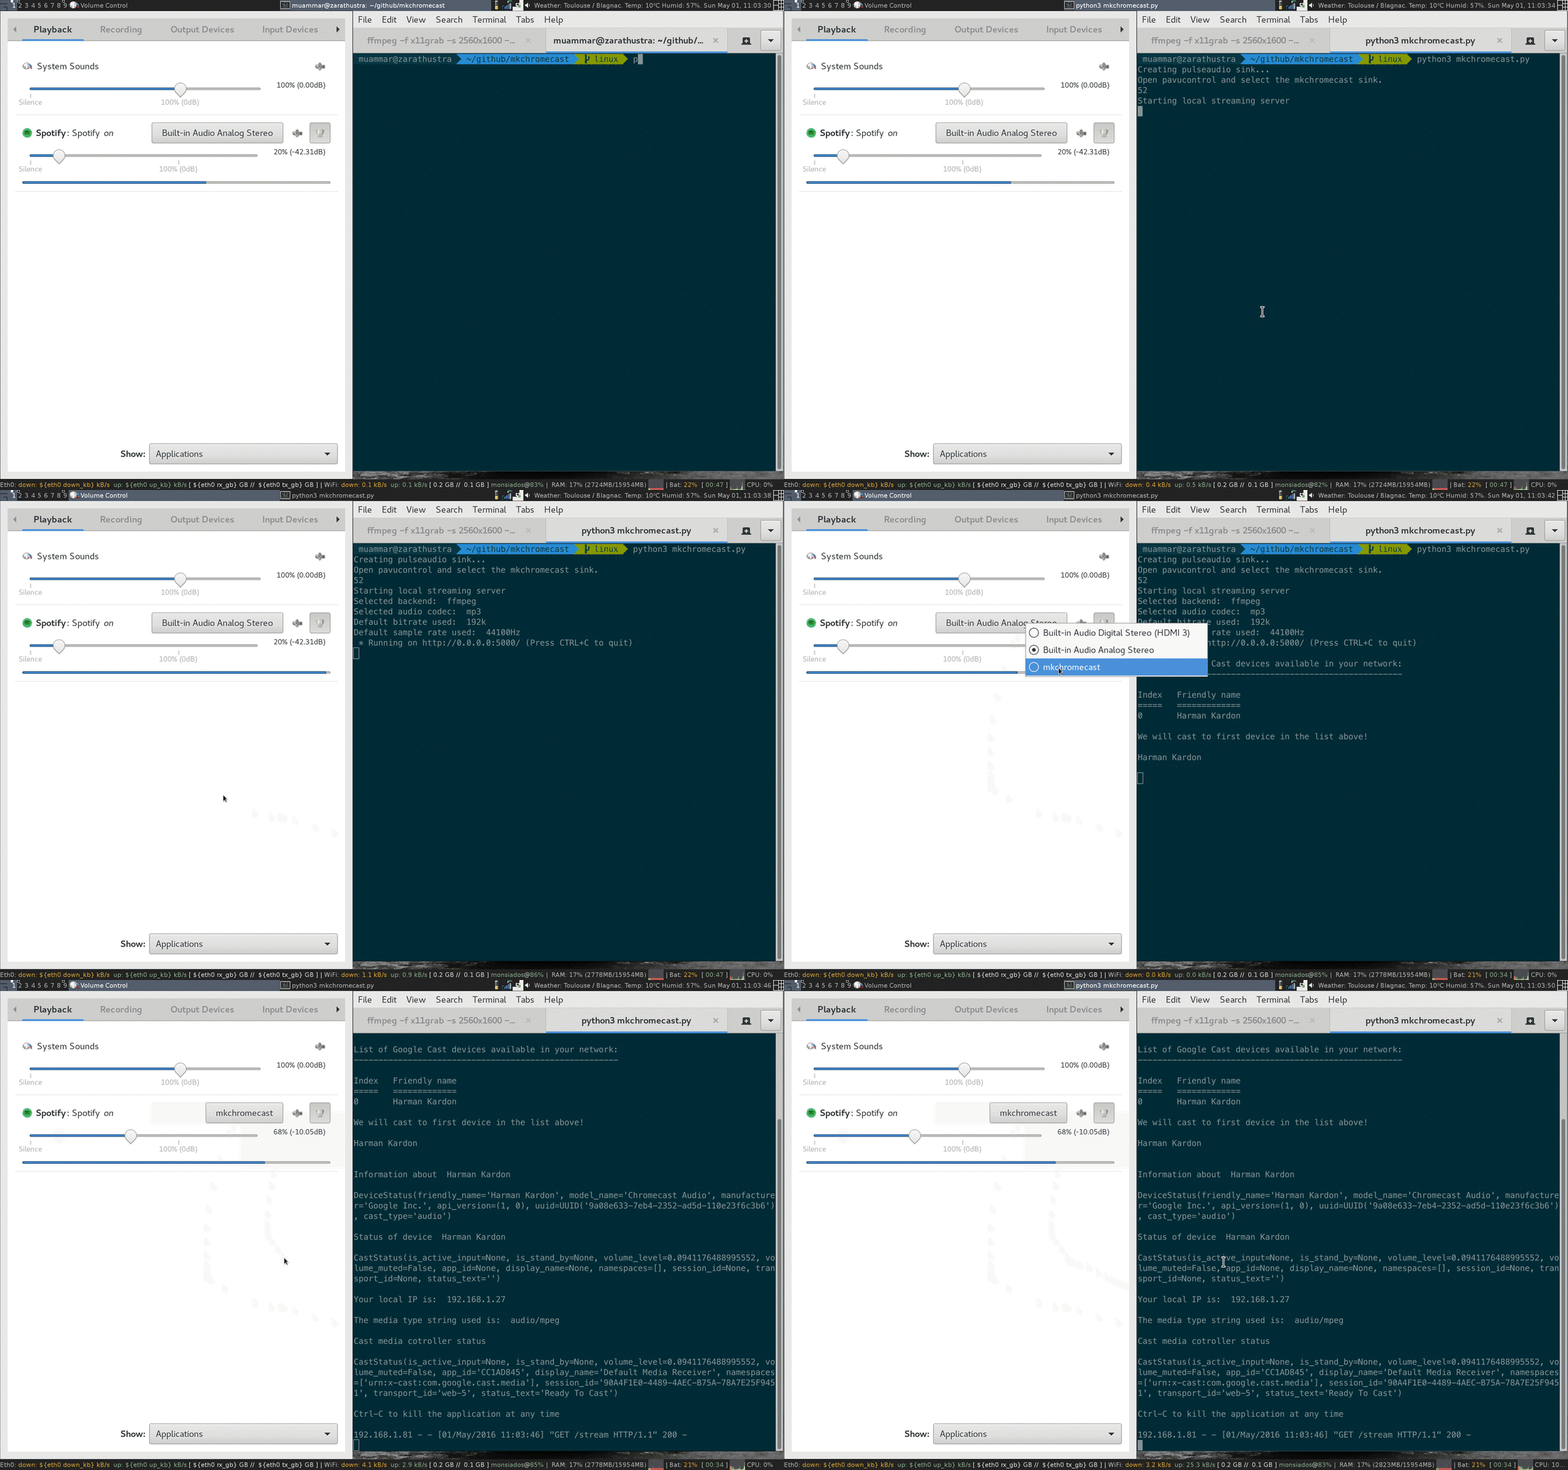
To have an idea of using mkchromecast from console check this gif.
mkchromecast provides a beta system tray menu. It requires you to
install PyQt5. For more information check the Requirements
and Install sections.
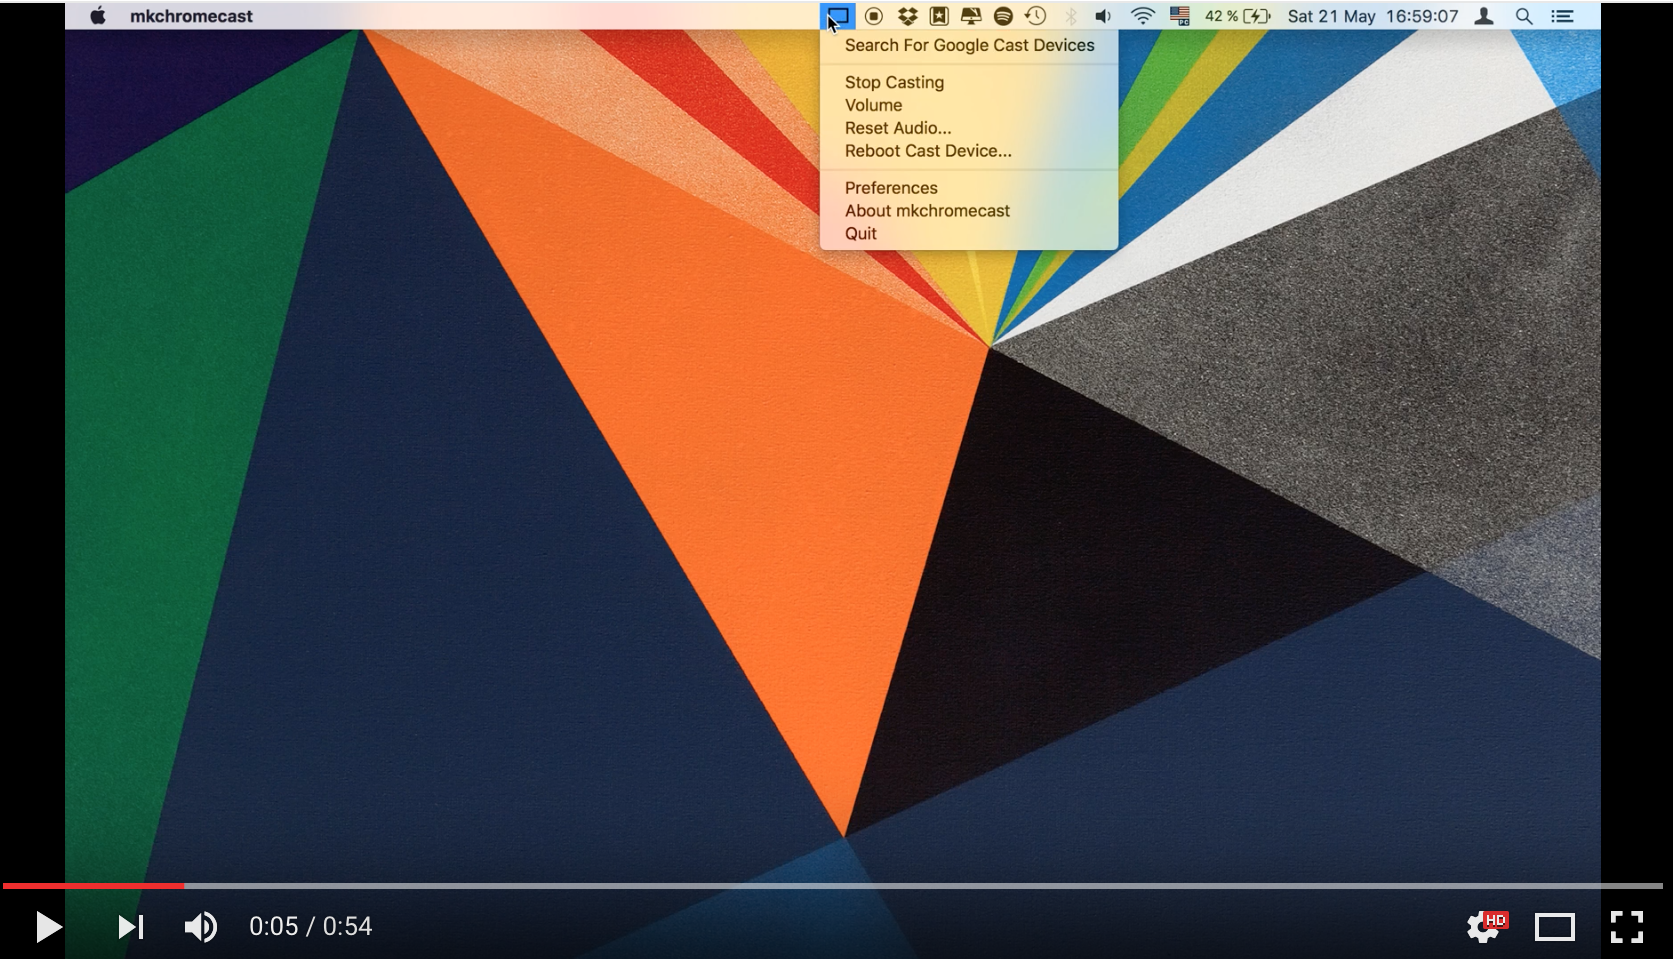
The system tray menu looks like:
Check these images:
In order to use mkchromecast you need the following software to stream with
node.js:
- Python2 (already shipped in OS X), or Python3.
- pychromecast.
- psutil.
- mutagen.
- Soundflower.
- PyQt5 (optional if you want to use the system tray menu).
For more control, you need ffmpeg as backend. In that case install the
following:
- flask (optional).
- ffmpeg (optional).
- youtube-dl (option if you plan to cast youtube URLs).
- Pulseaudio.
- Python2, or Python3.
- pychromecast.
- psutil.
- mutagen.
- flask.
- vorbis-tools.
- sox.
- lame.
- flac.
- faac.
- ffmpeg (optional).
- avconv (optional).
- PyQt5 (optional if you want to use the system tray menu).
- youtube-dl (option if you plan to cast youtube URLs).
There are two ways of installing this application:
There is a standalone application for macOS users. You need to drag it to your
/Applications/ folder.
Download the latest dmg here. You need also to install Soundflower.
If you are using homebrew, it is possible to install the binary as follows:
brew cask install mkchromecast
If you find any problem with the application, please report it here.
- Debian
- Ubuntu
Download the latest deb package here, and install it as follows:
sudo dpkg -i mkchromecast_$VERSION_all.deb
where $VERSION = X.Y.Z-Rev, e.g.: 0.2.6-1. Then, if the dependencies are
not available you have to do:
sudo apt-get -f install
This should work in Debian Unstable and Testing. I would appreciate Ubuntu testers as well. If you find any problems, please report it here.
To install mkchromecast, clone this repository:
git clone https://github.com/muammar/mkchromecast.git
Or you may download one of the stable releases here, and unzip the file.
To install the python requirements use the requirements.txt file shipped in
this repository:
pip install -r requirements.txt
Note: if this step fails, maybe you need to run the installation with
sudo as shown below. However, before installing using this method verify why
a regular user cannot install the requirements.
sudo pip install -r requirements.txt
Linux users can try to install these python requirements using the package managers coming with their distributions.
Example for Debian based distros:
sudo apt-get install python2.7 python-pip python-pychromecast python-flask python-psutil python-setuptools python-mutagen python-gi vorbis-tools sox lame flac faac opus-tools
For Soundflower you can check https://github.com/mattingalls/Soundflower/ and just download the latest dmg file.
If you have Homebrew you can use brew cask as follows:
brew cask install soundflower
By default, the sample rate in Soundflower is set to 44100Hz. If you desire
to stream at higher sample rates follow the instructions in the
wiki.
Note: re-sampling to higher sample rates is not a good idea. It was indeed
an issue in chromecast audio devices. See this thread.
Therefore, if you want to go beyond 44100Hz you have to capture the sound at
a higher sample rate.
The easiest way of installing ffmpeg is using a package manager, e.g.: brew,
macports or fink. Or in the case of Linux, e.g.: apt, yum, or pacman.
I will briefly describe the case of Homebrew here. First, you will need Homebrew installed in your machine:
/usr/bin/ruby -e "$(curl -fsSL https://raw.githubusercontent.com/Homebrew/install/master/install)"
Once Homebrew is ready, you can install ffmpeg. As stated in the ffmpeg
website, and for being
able to use all audio coding formats in mkchromecast, it is better to
install ffmpeg with the following options enabled:
brew install ffmpeg --with-fdk-aac --with-ffplay --with-freetype --with-libass --with-libquvi --with-libvorbis --with-libvpx --with-opus --with-x265
mkchromecast does not support avconv in macOS.
As I use Debian, the way of installing ffmpeg is:
apt-get install ffmpeg
or avconv
apt-get install libav-tools
Audio coding formats available with parec, ffmpeg and avconv backends
| Audio coding format | Description | Notes |
|---|---|---|
mp3 |
MPEG Audio Layer III (default) | Lossy compression format (default bitrate: 192k) |
ogg |
Ogg Vorbis | Lossy compression format (default bitrate: 192k) |
aac |
Advanced Audio Coding (AAC) | Lossy compression format (default bitrate: 192k) |
wav |
Waveform Audio File Format | Lossless format (HQ sound) |
flac |
Free Lossless Audio Codec | Lossless format (HQ sound) |
These Python bindings are needed if you intend to use the system tray menu. As
of today April 28th, pip is able to install PyQt5. Therefore, you can do
a pip install pyqt5.
If this does not work for you, I suggest you to install it using a package manager.
Example with Homebrew:
brew install pyqt5 --with-python
- Debian
For Python2:
apt-get install python-pyqt5
For Python3:
apt-get install python3-pyqt5
or if you desire it you can do it yourself from the sources.
To update mkchromecast sources, just get into the cloned directory and:
git pull
or if you prefer it, you can just pass the --update argument to
mkchromecast:
python mkchromecast.py --update
If you are using the macOS application, download the latest dmg
here, and replace the
mkchromecast.app in your /Applications/ directory.
Linux users need to download the latest deb
here, and dpkg -i mkchromecast_$VERSION_all.deb.
Get into the cloned mkchromecast directory and execute:
python mkchromecast.py
This will launch mkchromecast using node.js (or parec for Linux
users), and will do the streaming part together with the mp3 audio coding
format. node.js works decently but the server tends to fail under certain
situations. In such a case, mkchromecast is able to restart the
streaming/casting process automatically. So, some hiccups are expected.
Note: most of the steps described herein are the same for macOS and Linux
users. However, if you launch the command above in Linux, the process is
less automatized. In Linux, you need to select with pavucontrol the sink
called mkchromecast to stream. See the wiki for more
information. tl;dr?, just
check the gif below.
Note: the cast process is independent from the selection of the pulseaudio sink. This means that mkchromecast will tell the cast device to listen your computer but no sound will be heard until you select the sink.
Below an example using mp3:
python mkchromecast.py --encoder-backend ffmpeg
With ffmpeg you can modify the codec:
python mkchromecast.py --encoder-backend ffmpeg -c aac
change the bitrate and sample rate:
python mkchromecast.py --encoder-backend ffmpeg -c mp3 -b 128 --sample-rate 31000
check the section Soundflower (macOS users only) for more about sample rates.
To cast using parec and wav audio coding format:
mkchromecast -c wav
There is also an option to change the bitrate, and in this case with ffmpeg:
mkchromecast --encoder-backend ffmpeg -c ogg -b 128
and another one to change the sampling rate:
mkchromecast --encoder-backend ffmpeg -c ogg -b 128 --sample-rate 48000
Note: to use avconv just replace from ffmpeg to avconv in the
commands above.
To launch it:
python mkchromecast.py -t
or
mkchromecast -t
The system tray application can perform all the actions from the aforementioned commands. To get an idea, please check the Youtube video here.
You can play Youtube URLs headlessly from the command line:
python mkchromecast.py -y https://www.youtube.com/watch\?v\=NVvAJhZVBT
To use this function, you need to install youtube-dl. In macOS, this can be
done with homebrew: brew install youtube-dl. In Debian based distros:
apt-get install youtube-dl.
Note: you may need to enclose the URL between quotation marks.
You can control the volume of your Google Cast device by launching
mkchromecast with the option --volume:
python mkchromecast.py --encoder-backend ffmpeg -c ogg -b 320 --volume
This will allow you to press u and d keys for volume up
and volume down respectively.
The system tray has a window with a volume slider to do volume up and volume down.
To get more help:
python mkchromecast.py -h
or when installing the debian package:
mkchromecast -h
To kill mkchromecast when you run it from console, there are two ways of
doing it: if you didn't use the --volume option, just press
Ctrl-C. Otherwise, you will need to press the
q key to quit.
When launching from system tray, use the Quit button in the system tray.
No new issues reported.
When using parec and lame encoder, the delay between audio played and
listened can be up to 8 seconds. I suggest you to use something different than
mp3.
You can also check the FAQ for more information.
- Verify all exceptions when the system tray menu fails.
- More eye candy.
- Check that the index of the cast selected is correctly passed in the system tray.
- Video?.
If you want to contribute, help me improving this application by reporting issues, creating pull requests, or you may also buy me some pizza :).


