-
-
Notifications
You must be signed in to change notification settings - Fork 60
Modding support
Like the original DOS executable, Rigel Engine supports replacing individual files from the game's data pack file (NUKEM2.CMP) with external files. This makes it possible to use existing patches and mods.
On top of this, Rigel Engine features enhanced modding support. This includes high fidelity replacements (as of v0.8.0) and a mod manager (as of v0.8.5).
High fidelity replacements: Many assets can be replaced with files in modern formats, and the replacements can be higher fidelity. For example, graphics can be replaced with PNG images that have a higher resolution and alpha channel, music can be replaced with MP3 files etc. For graphics, the game seamlessly mixes assets of different resolutions. In other words, you can use a mixture of 4k backgrounds and original resolution sprites, if you so desire, and everything will be combined together properly (the high res art will appear at high resolution, while original art will be upscaled).
Mod manager: This makes it possible to organize mods using directories, enable/disable individual mods from within the game, and specify the order in which mods are loaded.
As of version 0.8.5, there are two ways of adding mods/replacement files to the game: In the mods directory, or at the top level. The former is the recommended way.
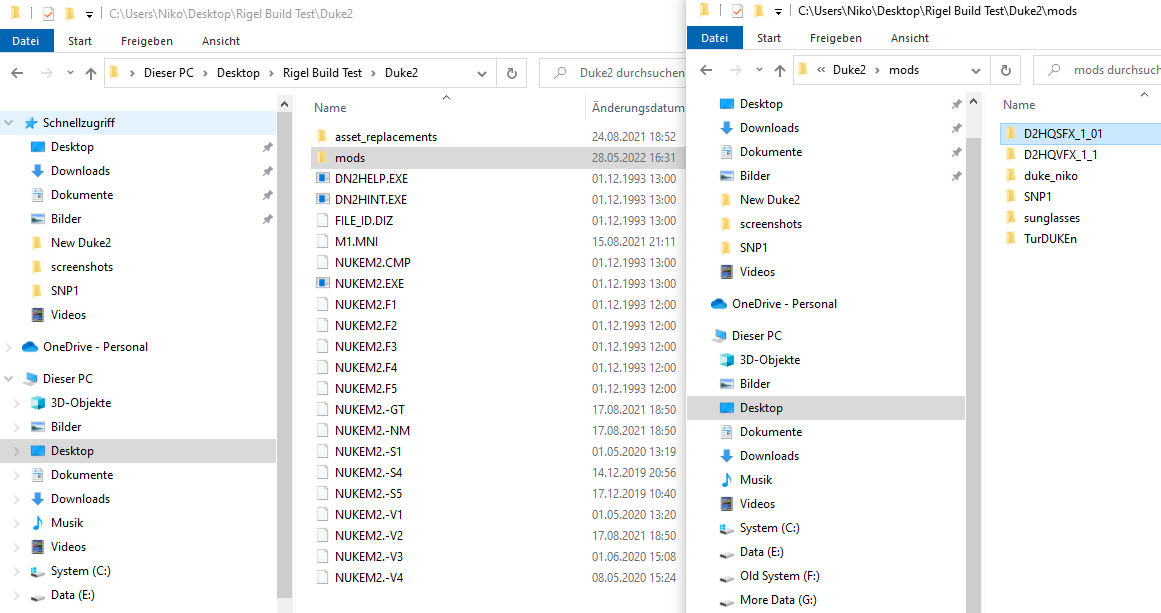
The game looks for a directory called mods within the game directory (i.e. where NUKEM2.CMP is located). If it exists, every subdirectory of the mods directory is considered a mod. Here's an example:

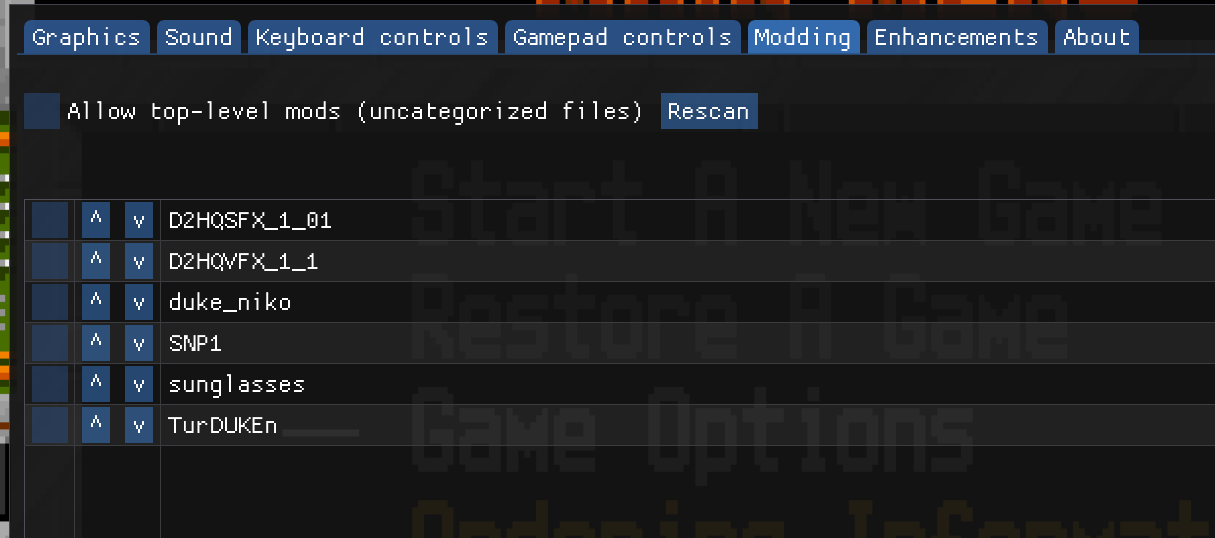
This directory structure will be reflected in the game's mod manager as follows:

Files within each mod directory are treated as replacement files. E.g., a file called L1.MNI in a mod directory will be used instead of the corresponding file from NUKEM2.CMP. If multiple mods are enabled that all contain a version of the same file, the version from the bottom-most mod (as per the ordering in the options menu) will be used. In other words, mods can override content from other mods, and the order is determined via the mod manager in the options menu.
In addition to replacing files from the .CMP file, a mod directory can also contain replacements in modern formats. These need to follow the naming scheme described below. For example, a file called kickbuta.mp3 would replace the music file KICKBUTA.IMF.
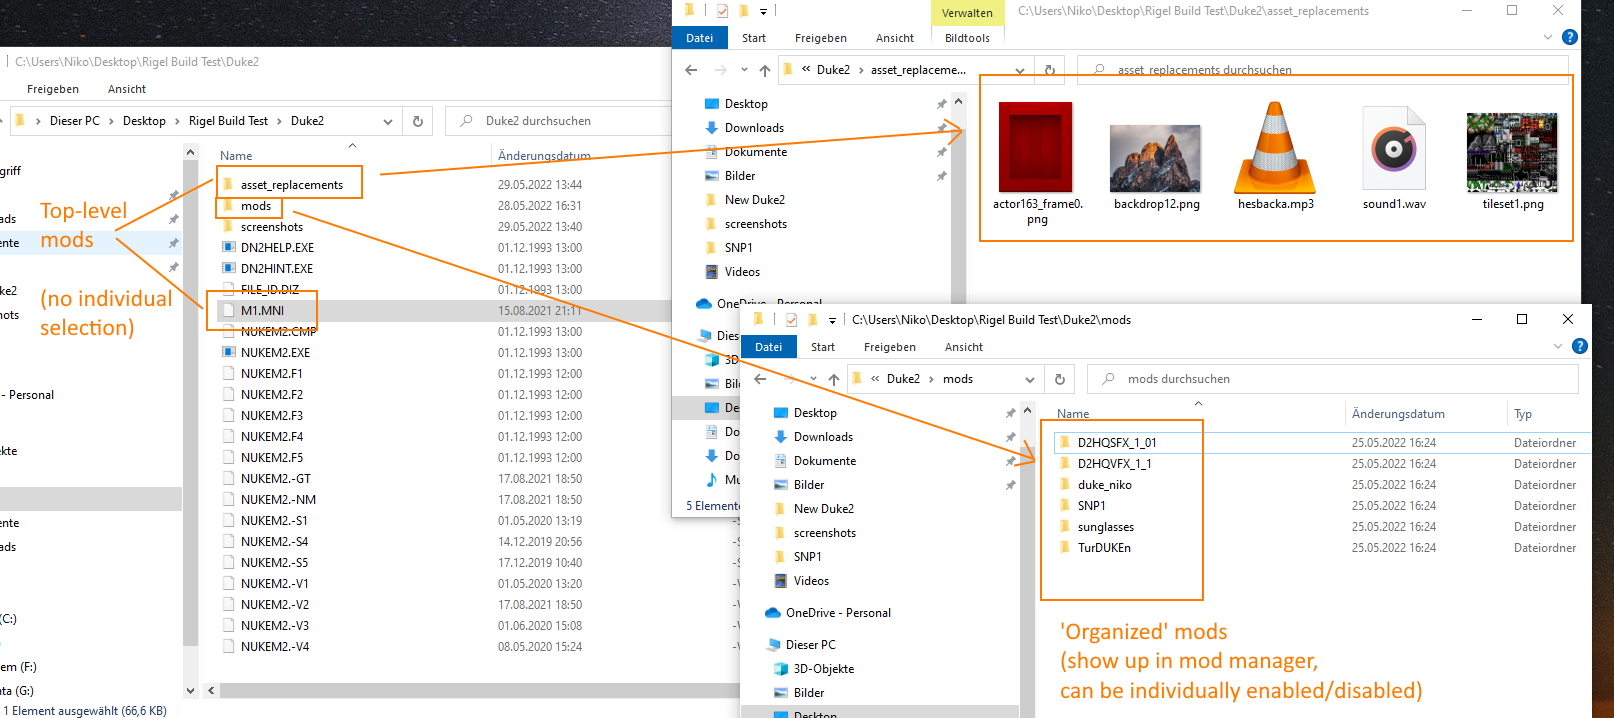
In addition to the mods directory, it's also possible to put replacement files directly next to the .CMP file. This matches the modding support offered by the original DOS version, and was the only option offered by older versions of RigelEngine (before 0.8.5).
It's also possible to use high-fidelity replacements at the top level, but the files must be placed in a directory called asset_replacements. This is different from the mods directory approach, where high-fidelity and original format files are placed next to each other.
Top-level replacement files will only be loaded if the corresponding checkbox in the options menu is ticked. However, it's not possible to control the loading of individual files at the top level, it's an "all or nothing" situation. Because of that, I would strongly recommend using the mods directory approach nowadays.
Here's an example which consists of both top-level and mods-dir replacements:

I also made a video demonstrating high-fidelity replacements, and the naming schemes used: https://youtu.be/bqF6EVP2qoA Note that the video was made before the introduction of the mod manager, and is thus using the top-level approach.
| Type | Naming scheme | Supported formats | Notes |
|---|---|---|---|
| Tile sets | tileset<N>.png |
PNG |
<N> must match the (hexadecimal) number of the tileset to be replaced. E.g. tileset2.png to replace CZONE2.MNI, tilesetA.png to replace CZONEA.MNI, etc. |
| Backdrops | backdrop<N>.png |
PNG | Just like with tile sets, backdrop1.png replaces DROP1.MNI etc. |
| Sprites | actor<N>_frame<F>.png |
PNG |
<N> is the actor ID and <F> is the animation frame. For example, the blue guard enemy has ID 159. To replace all animation frames of that sprite, files named actor159_frame0.png up to actor159_frame12.png should be provided. |
| Sound effects | sound<N>.wav |
Wave |
<N> is the sound effect number, starting at 1. See note below on intro movie sound effects. |
| Music | see notes | Ogg, Mp3, Flac, Opus, Wave, various module formats | To replace music, the filename needs to match the name of the game's original music file, but with one of the supported formats' extensions instead of IMF. E.g. kickbuta.mp3 to replace KICKBUTA.IMF. A variety of file formats is supported, essentially any format supported by the SDL_mixer library. This includes tracker module formats supported by ModPlug. |
- It's currently not possible to replace full screen images like the menu background or episode end screens, except by replacing with files in the original game's format.
- It's not possible to replace the large menu font with a modern format.
- Using any high-resolution graphics forces nearest neighbor scaling.
- In-game text, like the tutorial messages when picking up items, can't be changed except by compiling a custom executable.
To replace the sound effects used in the intro movie (Duke at shooting range), use the following:
-
sound35.wav- gun shot sound -
sound36.wav- gun shot sound (2) -
sound37.wav- falling shells -
sound38.wav- target moves -
sound39.wav- target stops -
sound40.wav- "I'm" -
sound41.wav- "back"
This is different from the naming of these files in the original game data, and these numbers are not shown in editing tools. I just defined them this way for RigelEngine.
Replacement graphics have no restrictions w.r.t. color, the full RGB spectrum can be used. Files can contain an alpha channel, and will be rendered accordingly. Replacement graphics can either match the resolution of the original graphics, or be higher resolution.
The way this works is that the engine determines the on-screen area that should be occupied by a graphic like a sprite, and then stretches whatever graphic is used (replacement or original) to fill that area.
For example, Duke Nukem's idle pose is 32x40 pixels in the original art. When running the engine at, say, 1920x1080 resolution, this will be upscaled to 144x216 pixels. Now if a replacement sprite is used, it will also be displayed as 144x216, regardless of the actual size of the replacement.
One important point is that the scaling takes aspect ratio correction into account: The original game's 320x200 resolution is stretched vertically when playing on a period-appropriate CRT monitor with 4:3 aspect ratio (320x200 is actually 16:10 without the stretching). To faithfully recreate the look of the game, RigelEngine therefore replicates this vertical stretching.
Now this means that if you were to replace the aforementioned Duke sprite with a replacement that's twice the size, i.e. 64x80, it will also undergo the same vertical stretching. With a replacement that already matches the aspect ratio of the on-screen display this won't be the case. E.g. 72x108, 80x120. These example sizes have an aspect ratio of 2:3, which matches the on-screen display of the sprite (144x216 at 1080p), whereas the original art (32x40) has an aspect ratio of 4:5.
Now how do you figure out what size to use for replacements in order to avoid vertical stretching? The easiest is to use the original art's size scaled by a factor of 5 horizontally, and 6 vertically. These scaling factors transform images into their aspect-corrected equivalents without any artifacts, since the scaling is by integer multiples on both axes. For full-screen images (320x200), this gives us a resolution of 1600x1200. For the Duke sprite example, it gives us 160x240.
Alternatively, you can decide to target a certain resolution like 1080p or 4k, and then determine the scaling factors that the engine will use. In the example above, I mentioned that the Duke sprite will occupy 144x216 pixels on-screen after upscaling when running at 1080p, but how did I determine these numbers? With the following formula:
scale_x = screen_height * 4/3 / 320
scale_y = screen_height / 200
So for 1080p, we would calculate the horizontal scale as 1080 * 4/3 / 320 = 4.5, and the vertical scale as 1080 / 200 = 5.4. If we then apply these factors to the Duke sprite, we get the numbers we used: 32 * 4.5 = 144, 40 * 5.4 = 216.
With this method, it's possible to determine the ideal size for a replacement graphic to appear on screen without any scaling at all at a certain resolution. If someone plays the game at a different resolution than the one you targeted, there will still be scaling but the aspect ratio of your art will be preserved.
Backdrops are handled a little differently compared to other graphics, in order to allow for wide backgrounds. The vertical stretching mentioned above will only be applied if a replacement backdrop matches the original art size, i.e. 320x200. If the replacement is larger on any axis (i.e. 640x200, 320x240 etc.), the graphic will be scaled uniformly in order to have it fill the entire screen vertically.
For example if you have a backdrop that's 216 pixels high and you're playing at 1080p, then it will be scaled by a factor of 5 (1080/216 = 5) both vertically and horizontally, regardless of the horizontal size.
To extract assets from the original game and convert them to modern formats, various tools can be used. I can recommend K1n9_Duk3's Enormous Tool: It's a level editor, but also allows browsing the game's various assets and exporting them. It's also a good source for figuring out the numbers of sound effects etc. Unfortunately, it only runs on Windows.
Some other tools that I'm aware of: