-
Notifications
You must be signed in to change notification settings - Fork 3
Prerequisites and First Time Setup
These instructions are for VSDK Unity. For VSDK Unreal documentation, see the VSDK Unreal wiki.
For these tutorials, you will need Unity 2018.3 or newer and either SteamVR or Oculus installed. Most major PC HMDs will work with one of these VR systems, but refer to the wiki for a complete list of supported devices.
We will now cover the steps needed to setup a basic scene with VSDK.
- First, create a new Unity project.
- Next, import the appropriate VR SDK for your VR system:
- If using SteamVR, import the SteamVR plugin from the Unity asset store: https://assetstore.unity.com/packages/tools/integration/steamvr-plugin-32647
- If using an Oculus Rift, import the Oculus Integration plugin from the Unity asset store: https://assetstore.unity.com/packages/tools/integration/steamvr-plugin-32647
- Optional: Uncheck the ‘Sample Framework’ folder in the Oculus Asset package to decrease import time as well as build time and size.
- If you are planning on using the Leap Motion for hand tracking, install that now:
- Install the Leap Motion Orion Beta software at https://developer.leapmotion.com/get-started
- Download the Unity Core Assets version 4.4.0 from: https://developer.leapmotion.com/unity and import it into your project by double-clicking the asset package.
- Next, import VSDK:
- Download the latest VSDK release package from: https://github.com/charles-river-analytics/VSDK
- Double-click the VSDK.assetpackage file to import it
- At this point, your project organization should look like the following:

- Create a new scene in Unity by click File > New Scene.
- Delete the ‘main camera’ object from the hierarchy by clicking on it and pressing the ‘delete’ key.
- In the assets view, navigate to the Assets/VIRTUOSO/Prefabs folder and drag the [VRTK_SDKManager] and [VRTK_Scripts] objects into the scene
- [VRTK_SDKManager] loads and unloads XR systems and ensures that only properly configured XR setups are used
- [VRTK_Scripts] provides script aliases that can attach behaviors to the controllers of the currently active devices
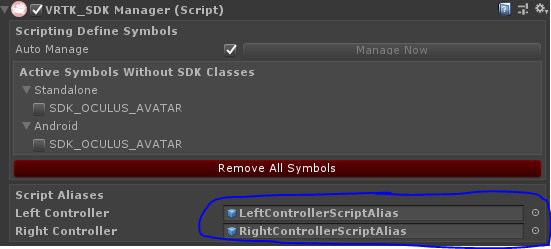
- Expand [VRTK_Scripts] and then click on [VRTK_SDKManager] and drag the LeftControllerScriptAlias and RightControllerScriptsAlias objects into the left/right script alias fields on the SDK manager (see figure below).

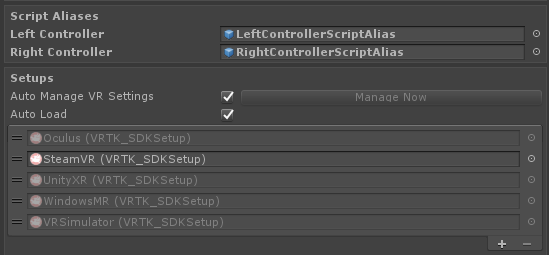
- Below the Script Aliases section is a listing of available SDKS (see below). If there is an issue with a specific SDK or the SDK is not installed, it will be grayed out. An example setup using SteamVR is shown below:

SteamVR and Oculus each have some additional steps to complete setup.
If you are using SteamVR 2.0 or higher (the default version on the Unity asset store), you will need to complete a few additional steps due to changes in SteamVR’s input system. Note that during setup, you may see errors
- Copy all of the files in Assets/VIRTUOSO/Config to the StreamingAssets/SteamVR folder (you may need to create this folder if it doesn't exist already).
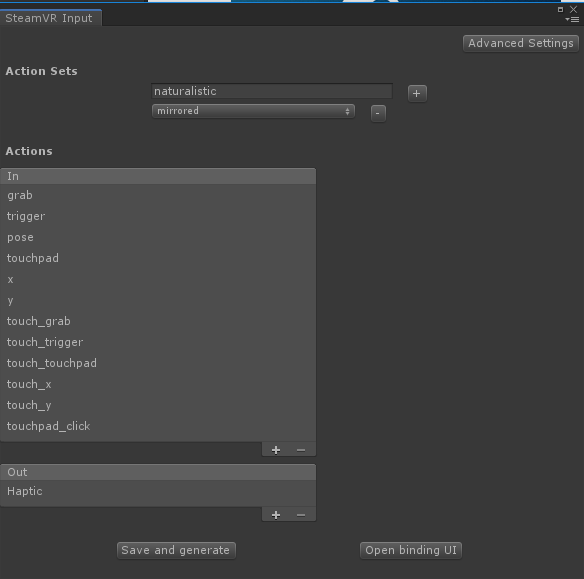
- In the Unity editor, go to the Window > SteamVR Input menu. If the json files were placed correctly, the window should contain an input set called ‘naturalistic’ (see below). If so, click 'save and generate' to finish the SteamVR setup.

-
Expand the VRTK_SDKManager Tree down to the SteamVR object. Delete the children objects (if Unity shows an error about deleting objects from prefabs, right click on the SDK Manager and select ‘unpack prefab’). Then, drag the [SteamVR] and [CameraRig] prefabs from the SteamVR/Prefabs folder onto the SteamVR object in the tree to child them.
-
Click on the object named [SteamVR] and then click Add Component to add the 'SteamVR_Behavior' script.
-
Uncheck the Do Not Destroy checkbox
First, setup the Oculus SDK Setup:
- Expand the VRTK_SDKManager Tree down to the Oculus object. Delete the children objects (if Unity shows an error about deleting objects from prefabs, right click on the SDK Manager and select ‘unpack prefab’). Then, drag the OVRCameraRig prefab from the Oculus/VR/Prefabs folder onto the Oculus object in the tree to child them.
- Click on the OVRCamera rig and change the Tracking Origin Type to Floor Level Unlike SteamVR, Oculus does not include controller models by default. To fix this:
- Expand the Oculus object tree until you find LeftControllerAnchor and RightControllerAnchor
- Navigate to Assets/Oculus/VR/Meshes/OculusTouchForRift and drag “left_touch_controller_model_skel” into the hierarchy as a child of LeftControllerAnchor and “right_rouch_controller_model_skel” into the hierarchy as a child of RightControllerAnchor
As a final test, click the play button to enter play mode in Unity. You should be able to put on the HMD and look around; verify that the controller models are following your hands. If you are experiencing issues at this point, it is likely due to an error in either your VR setup, so ensure that is properly installed and working before continuing.