-
-
Notifications
You must be signed in to change notification settings - Fork 1
Configuration Guide
To access the Twitch Extension configuration page, head to https://dashboard.twitch.tv/u/<YOUR_TWITCH_USERNAME_HERE>/extensions/manage.
There you should see the Extension and press the Settings icon.

A new window with the extension's configuration should appear.
Once you are on the Overview Page where all your channel Extensions are listed, you just need to add the Extension either as Panel or Component.
The difference between the two is explained in detail in the Twitch Documentation.
TL;DR: Panel is in your About, Component is on the right side of the Stream.
This section is all about integrating the Queue Overview Page into your Livestreaming Software.
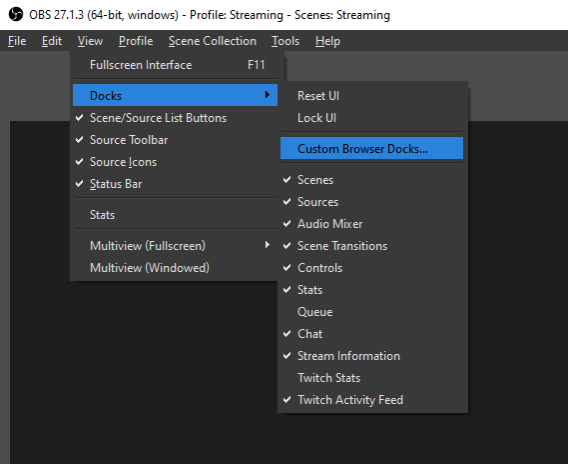
For OBS, we need to create a custom Browser Dock.
This can be done by navigating to View → Docks → Custom Browser Docks (as seen in the Screenshot below)

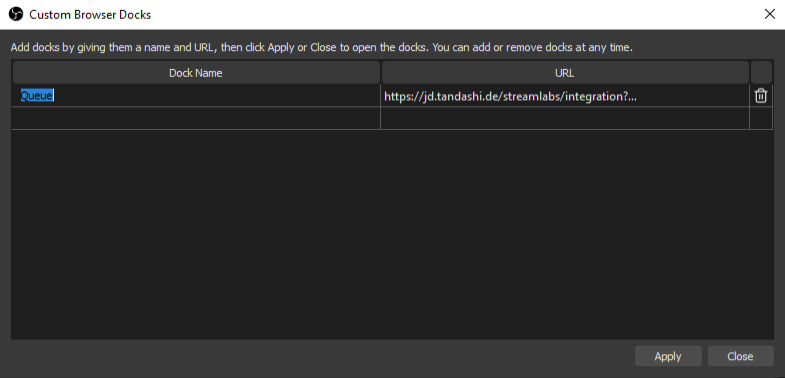
A new window should appear where you can enter the Dock name as well as the URL to the Queue Overview Page.
If you don't know how to get your Queue Overview Page URL, please see Get your Queue Overview Page URL. Also make sure that you use the one with Controls enabled.

After you entered the name and URL, you can hit Apply.
Now you should be able to access that Dock under View → Docks and position and size as you'd like.
For Streamlabs, you need to visit the Layout Editor.
Once there, Drag and Drop the Website Component into your layout and enter the Queue Overview Page URL. Now you should be good to go 🚀.
If you don't know how to get your Queue Overview Page URL, please see Get your Queue Overview Page URL. Also make sure that you use the one with Controls enabled.
To get your Queue Overview Page URL, head over to the configuration of the Just Dance Request Twitch Extension. If you don't know how to access that, please see How to Access the Extension Configuration Page.
A new window with the extension's configuration should appear. In there, navigate to Integrations to get your Queue Overview Page URL.