-
Notifications
You must be signed in to change notification settings - Fork 44
Home
This guide will help you setup the ultimate automatic torrent downloading solution. You will setup and configure, on Ubuntu server 16.04, rTorrent+ruTorrent, Sonarr, CouchPotato and Apache as a reverse proxy for all these. This guide assumes that you would like to be able to access all these interfaces from anywhere on the Internet (using a login form secured with an SSL certificate) and that you have a domain name you will use. If you don't have a domain name yet see the section called Domain Name and Dynamic DNS at the end of this guide. This guide includes obtaining a free SSL certificate from Let's Encrypt. Your domain name should alredy be set up and pointing to your external ip address which in turn should be forwarding to your Ubuntu box. The following ports need to be open in your firewall and forwarded to your Ubuntu box: 80 and 443 for access to the web interfaces, and 22 if you want ssh access remotely. The port that rTorrent is configured to use needs to be open, in this guide its 49155 by default.
We will be using the ruTorrent plugins autotools, ratio & extratio to accomplish what we want. The way these plugins work is best described by an example:
Say you have a directory /torrent for your torrent downloads. What you would do is create three sub dirs in that directory called watch, download and complete. Inside these directories will contain a mirrored directory structure for the different categories of torrents you download. So your structure might look like this:

So if you drop a torrent into /torrent/watch/tv/sonarr, the torrent download is started in /torrent/download/tv/sonarr. Also a label is automatically applied to the torrent based on the directory: in this example our torrent would receive the label tv/sonarr. Once the torrent is finished downloading, a hard link will be created in /torrent/complete/tv/sonarr. A hard link means that a duplicate file is made, but it shares the same data as the original. This is better than copying because it is instant and you don't have to duplicate the data on your hard drive. So now if we just have Sonarr watch the /torrent/complete/tv/sonarr directory it can process the hard linked files and move them to a final TV directory, AND we can continue to seed with the original file in /torrent/download/tv/sonarr with no problems. Even when we delete the file in the download directory, it won't affect the other hard link in the place where Sonarr placed it.
We'll also create some Ratio Rules that will seed a torrent of a specific label to a specified ratio and then automatically delete the torrent. So you won't have to monitor your torrents and manually clean them up when they've seeded enough, they will automatically seed to the perfect amount and then delete themselves.
The end result will be: you add a show to Sonarr, Sonarr will automatically search for new episodes and download the torrent file as soon as it's available. The torrent will be added and started in rTorrent. As soon as the download is complete, Sonarr will process the hard link of the data by renaming it nicely and placing it in a nice, organized TV Shows folder. Meanwhile rTorrent will still be seeding the original file until it reaches the defined ratio, and then will auto delete the torrent and the original file from the download dir. 100% automated TV downloading! Couchpotato does the same thing for movies.
Login as your user then execute these commands one line at a time.
Update Ubuntu
sudo apt update

sudo apt full-upgrade -y
Create a group named media. All the apps will be part of this group.
sudo addgroup --system media

sudo adduser $USER media
Install Prereqs
sudo apt install -y git subversion build-essential automake libtool libcppunit-dev libcurl4-openssl-dev libsigc++-2.0-dev libncurses5-dev zlib1g-dev libssl-dev zip unzip rar unrar mediainfo ffmpeg apache2 libapache2-mod-php php php-curl php-mbstring php-geoip python python-openssl python-lxml python-letsencrypt-apache
Compile xmlrpc
cd /usr/local/src

sudo svn checkout http://svn.code.sf.net/p/xmlrpc-c/code/advanced xmlrpc-c

cd xmlrpc-c

sudo ./configure

sudo make

sudo make install
Compile libtorrent
cd /usr/local/src

sudo git clone https://github.com/rakshasa/libtorrent.git

cd libtorrent

sudo ./autogen.sh

sudo ./configure

sudo make

sudo make install
Compile rTorrent
cd /usr/local/src

sudo git clone https://github.com/rakshasa/rtorrent.git

cd rtorrent

sudo git reset --hard 10ce6864b81aaf2a7e43e9959940696b47aac2bc

sudo ./autogen.sh

sudo ./configure --with-xmlrpc-c=/usr/local/src/xmlrpc-c/xmlrpc-c-config

sudo make

sudo make install

sudo ln -s /usr/local/bin/rtorrent /usr/bin/

sudo ldconfig

sudo adduser --system --home=/var/lib/rtorrent --group rtorrent

sudo adduser rtorrent media
Create the config directory for rTorrent
sudo mkdir -p /var/lib/rtorrent/session
Create and change directory to where you are going to download all your torrents to. For an example, this guide will use /data.
On your server, you will probably have a large chunk of storage configured on a certain mount point. The mount point is where you will want to change directories to.
It's important to realize that /data is just an example path that this guide uses, therefore, whenever you see /data in this guide be sure to change it to what the path to your storage actually is.
sudo mkdir /data

cd /data
Then execute this command which will create the folder structure I illustrated earlier:
sudo mkdir -p torrent/{complete/{movie/couchpotato,music,tv/sonarr,game,book,software,other},download/{movie/couchpotato,music,tv/sonarr,game,book,software,other},watch/{movie/couchpotato,music,tv/sonarr,game,book,software,other}} Media/{Movies,'TV Shows'}
Make your user the owner of these folders and set the default permissions by executing these commands:
sudo chown -R $USER:media /data/*

sudo chmod -R 775 /data/*
or whatever your path is.
Then run the following to set the group ID and the default group ACLs on the data folders:
sudo find /data/* -type d -exec chmod g+s {} +

sudo find /data/* -type d -exec setfacl -m default:group::rwX {} +
Download the configs repo, which contain the necessary config files you will need.
cd ~

sudo git clone https://github.com/xombiemp/ultimate-torrent-setup.git configs
Make rTorrent config file:
sudo mv ~/configs/rtorrent.rc /var/lib/rtorrent/
Edit /var/lib/rtorrent/rtorrent.rc and look for where it says
/CHANGE/THIS/PATH
for the directory path and edit the path for your setup. In our example, the directory path is the download directory we created previously, /data/torrent/download. Look for
APACHE_WEBAUTH_USER
at the bottom and change it to the user that you want to use for Apache web authentication (we haven't created the login yet but we will later). Change any other random options that you want.
sudo chown -R rtorrent:media /var/lib/rtorrent/*

sudo mv ~/configs/rtorrent.service /etc/systemd/system/

sudo systemctl enable rtorrent.service
The script update-rutorrent will install ruTorrent and any plugins you want automatically. Then whenever you run it again it will update ruTorrent and any plugins that have updates.
sudo mv ~/configs/update-rutorrent /usr/local/bin/
Edit /usr/local/bin/update-rutorrent and change the webroot_path if it is different for you (probably not). Edit the plugins variable to include or exclude any plugins that you want. You can leave it as it is to use the plugins that I use. The ones you have to keep are autotools, ratio, extratio and throttle. Once all the edits are made to the script, run it to install ruTorrent and your plugins:
sudo update-rutorrent
Edit /var/www/rutorrent/conf/config.php Change:
$saveUploadedTorrents = false;
Change $topDirectory to the top directory where your torrents are downloaded. In our example:
$topDirectory = '/data/';
Change:
$profileMask = 0775;
Edit /var/www/rutorrent/plugins/autotools/conf.php The $autowatch_interval variable is how often in seconds it looks in the watch folders for new torrent files. I changed mine to:
$autowatch_interval = 60;
Edit /var/www/rutorrent/plugins/filemanager/conf.php Set the mkdperm to:
$fm['mkdperm'] = 775;
Edit /var/www/rutorrent/plugins/fileshare/conf.php Set the $downloadpath variable to match the domain you will use to access your site:
$downloadpath = 'https://yourdomain.com/public/share.php';
Edit /var/www/rutorrent/plugins/unpack/conf.php Set the following variable values:
$deleteAutoArchives = true;
$unpackToTemp = true;
sudo a2enmod rewrite request headers proxy_http auth_form session_cookie session_crypto ssl
sudo mv ~/configs/apache-portal.conf /etc/apache2/sites-available/
Edit /etc/apache2/sites-available/apache-portal.conf and find all five instances of
SessionCryptoPassphrase CHANGEME
and change CHANGEME to the same unique passphrase of your choosing. You won't need to use it, it's just for encrypting the session cookie.
Change the values of the 4 occurrences of yourdomain.com to your domain name.
sudo a2dissite 000-default.conf

sudo a2ensite default-ssl.conf

sudo service apache2 restart

sudo letsencrypt certonly --apache
Enter your email address, agree to the Terms of Service and select your domain.
sudo a2dissite default-ssl.conf

sudo a2ensite apache-portal.conf
sudo mv ~/configs/letsencrypt.service /etc/systemd/system/

sudo mv ~/configs/letsencrypt.timer /etc/systemd/system/

sudo systemctl enable letsencrypt.timer

sudo systemctl start letsencrypt.timer
sudo mv ~/configs/site/* /var/www/

sudo mkdir /var/www/public

sudo ln -s /var/www/rutorrent/plugins/fileshare/share.php /var/www/public/
sudo htpasswd -c /etc/apache2/passwd APACHE_WEBAUTH_USER
Replace APACHE_WEBAUTH_USER in the command with the same username as you put in the bottom of rtorrent.rc.
Edit /etc/apache2/envvars and change:
export APACHE_RUN_GROUP=media
Add below that:
umask 0002
Edit /etc/php/7.0/apache2/php.ini and search for the line that contains date.timezone =. Set the value for your timezone from PHP Timezones. Mine looks like:
date.timezone = America/Denver
Edit /etc/php/7.0/cli/php.ini and do the same thing as above.
sudo adduser www-data media

sudo chgrp -R media /var/www/rutorrent/share/*

sudo find /var/www/rutorrent/share/* -type d -exec chmod 775 {} \;

sudo find /var/www/rutorrent/share/* -type f -exec chmod 664 {} \;
sudo adduser --system --home=/var/lib/sonarr --group sonarr

sudo adduser sonarr media

cd ~

sudo apt-key adv --keyserver keyserver.ubuntu.com --recv-keys FDA5DFFC

sudo echo "deb http://apt.sonarr.tv/ master main" | sudo tee /etc/apt/sources.list.d/sonarr.list

sudo apt update

sudo apt install -y nzbdrone

sudo chown -R sonarr:media /opt/NzbDrone

sudo mv ~/configs/sonarr.service /etc/systemd/system/

sudo systemctl enable sonarr.service
sudo adduser --system --home=/var/lib/couchpotato --group couchpotato

sudo adduser couchpotato media

cd /opt

sudo git clone https://github.com/RuudBurger/CouchPotatoServer.git

sudo chown -R couchpotato:media /opt/CouchPotatoServer

sudo mv ~/configs/couchpotato.service /etc/systemd/system/

sudo systemctl enable couchpotato.service

sudo rm -r ~/configs/
cd ~

sudo service apache2 restart

sudo service rtorrent restart

sudo service sonarr start

sudo service couchpotato start

sudo service sonarr stop

sudo service couchpotato stop
Edit /var/lib/sonarr/.config/NzbDrone/config.xml and change:
<UrlBase>/sonarr</UrlBase>
Edit /var/lib/couchpotato/settings.conf and change:
url_base = /couchpotato
sudo service sonarr start

sudo service couchpotato start
First browse to https://yourdomain.com/rutorrent
You will be presented with the login window:

Login with the username and password you created earlier.
Click on the gear cog to enter the settings.
In Autotools enable all the options and browse to your complete and watch directories. Also, be sure to select Hard Link for the operation type:

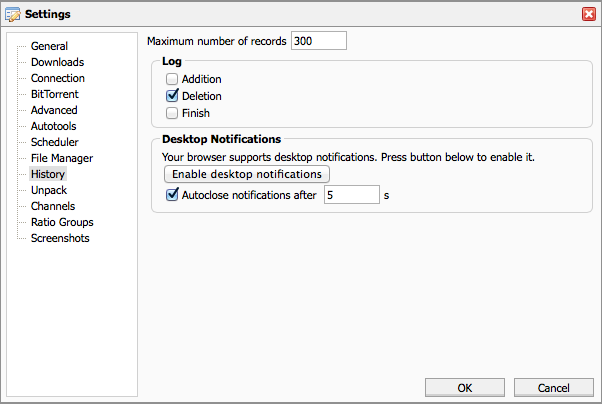
In History I only check Deletion. This is nice because Sonarr could download a torrent, seed it to 2.0, and delete it all while you are sleeping. So the History plugin will let you see a record of when it was deleted and what your ratio was, just for your sanity:
In Unpack check enable autounpacking:

In Ratio Groups set up a default group and a Sonarr group:

Click ok. Then click on the wrench/screwdriver next to the gear cog and click on Ratio Rules. Set up a rule for Sonarr:

You can setup another Ratio Rule for Couchpotato downloads too, if you want. Alternatively, you could set up ratio rules for each individual tracker by selecting "One of torrent's tracker URLs contain" from the drop down list.
Now when you add a torrent you just click on the directory button and choose which category it is. Then it will automatically receive that label and it will download to the proper directory.

Now browse to https://yourdomain.com/sonarr
Click on Settings and you'll see the Media Managment tab.
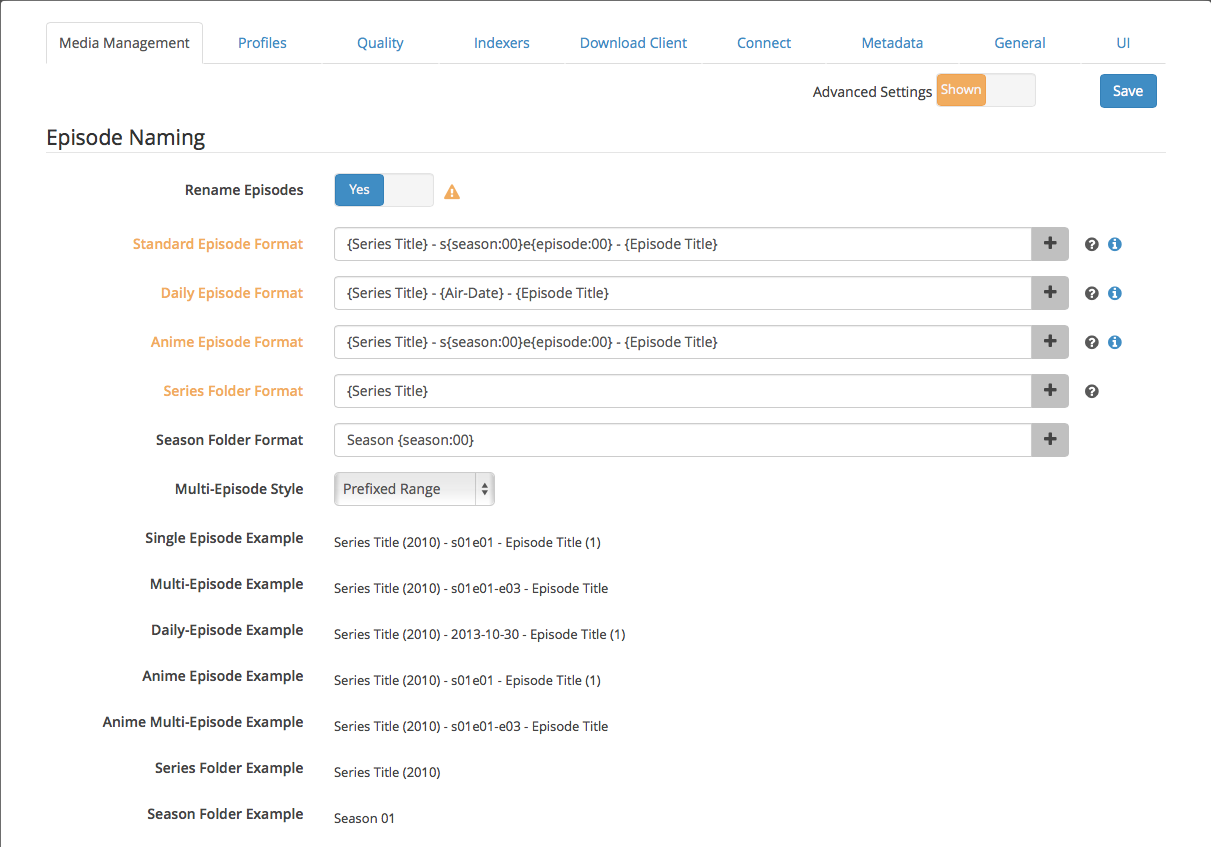
Move the switch to Shown next to Advanced Settings. Switch Rename Episodes to Yes. Set the renaming formats to the way you want. Mine are set to conform to Plex naming standards. Click the Save button.
Click on the Indexers tab.

Click the plus button to add your desired providers. Configure the provider with the info it asks for, which you will usually find in your respective rss feed url for the tracker. If your tracker does not support search, I would suggest checking out Jackett. It is a separate webapp that adds search capabilities to many trackers. I haven't used it personally, but I've heard it works well.
Click on the Download Client tab.

Click the plus sign and click Torrent Blackhole. For the Torrent Folder browse to your sonarr watch directory. In our example it would be /data/torrent/watch/tv/sonarr. For the Watch Folder browse to your sonarr complete folder. In our example it would be /data/torrent/complete/tv/sonarr. Turn Read Only to No.
Click on the General tab.

Turn Open browser on start to No. Change Log Level to Debug.
Click on Series -> Add Series -> Import Existing Series On Disk
Browse to your TV Shows folder. In our example it would be /data/Media/TV Shows/

Click the close button.
Now browse to https://yourdomain.com/couchpotato
You'll see a Wizard when you first login. Just scroll to the bottom and click the I'm ready to start the awesomeness! button; we'll configure the settings manually.
Click the gear cog and click settings. Switch the Show advanced option to on.
images/couchpotato/General-cp.png
Uncheck Launch the browser when I start.
images/couchpotato/General-Advanced.png
Check Enable debugging. Change Folder CHMOD to 0775. Change File CHMOD to 0664. Uncheck Automatically update when update is available. (This is a personal preference. I like to read what's been update before I apply the update.)
Click on Searcher.
images/couchpotato/Searcher.png
Turn on Always Search. Change the search frequency to what you want. Set First Search to torrents.
images/couchpotato/Providers-cp.png
Disable any providers you don't use. Enable and configure any that you do use.
Click Categories
images/couchpotato/Categories.png
You can create categories like the ones above. A required word of hq means it will only grab Golden Popcorn torrents (only useful for passthepopcorn). The other categories require the source to be Blu-ray and one will reject scene releases.
bluray, blu-ray, blu & ray
Click on Qualities
Configure your Quality Profiles to your preference.
images/couchpotato/Sizes.png
I've found that these sizes work well. I've missed some downloads when I used the default values.
Click Downloaders
images/couchpotato/Downloaders.png
Click Black hole and browse to your watch couchpotato directory. Change Use For to torrent.
Click Renamer and match my settings
images/couchpotato/Renamer.png
images/couchpotato/Rename-Advanced.png
Now that everything is configured you can add TV shows to Sonarr and movies to Couchpotato and watch the magic. You can update Sonarr using apt. CouchPotato will notify you in it's interface when it has updates available. You can keep ruTorrent up to date by running the update-rutorrent script again. If rTorrent releases an update that you want to install, just follow the install sections of this guide again with the new files for xmlrpc, libtorrent and rTorrent.
Enjoy 100% automated TV and movie downloading!
These are some additional things you can do that make this setup even better.
Both Sonarr and CouchPotato have the ability to notify you when they start a download and finish a download. My favorite provider, and the one I use, is Pushover. Pushover supports both iOS and Android and is simply a one time purchase rather than a monthly subscription.
Click Settings -> Connect. Check Pushover (or your provider of choice) and configure the settings.

Click the gear cog -> Settings -> Notifications. Check Pushover (or your provider of choice) and configure the settings.
images/couchpotato/Notifications.png
Now you will receive a notification when ever a show or movie starts and finishes downloading.
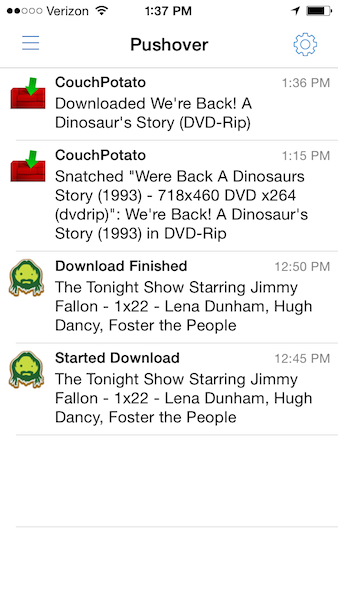
Now that everything is setup, you'll probably find yourself wanting to access these interfaces from your mobile device. I have an iPhone, so all the screenshots will be from that, but since these are all webapps, this should work from any device.
A mobile plugin was created by zebraxxl, but it appears he has abandoned it. I have created a fork of rutorrentMobile and made a number of enhancements.
The update-rutorrent script is set to automatically install this plugin so it should already be installed. Now from your mobile browser, browse to https://yourdomain.com/rutorrent and you should see the mobile interface for rutorrent. Add to your mobile home screen to create a web app.

Sonarr has a responsive design that is very functional on a mobile device. From your mobile browser, browse to https://yourdomain.com/sonarr and you should see the interface for Sonarr. Add to your mobile home screen to create a web app.

There is nothing special required for CouchPotato. Just from your mobile browser, browse to https://yourdomain.com/couchpotato and you should see the mobile interface for CouchPotato. Add to your mobile home screen to create a web app.
images/couchpotato/couchpotatoMobile.png
Resilio Sync is like Dropbox, but instead of syncing to the cloud first, the folders sync from Peer to Peer. We can set up Resilio Sync on our watch directory so that we are able to drop .torrent files into those directories from any device. On iOS for instance, you can download a .torrent file in Safari and then use the Open with... option to place the file in one of the watch folders, depending on the category. Then Resilio Sync will sync that file to all the Peers connected to it, includng our Ubuntu server, which means the .torrent file will be downloaded to the correct watch folder and picked up by ruTorrent immediately!
cd ~

wget -qO - https://linux-packages.getsync.com/resilio-sync/key.asc | sudo apt-key add -

sudo echo "deb http://linux-packages.getsync.com/resilio-sync/deb resilio-sync non-free" | sudo tee /etc/apt/sources.list.d/resilio-sync.list

sudo apt update

sudo apt install -y resilio-sync

sudo adduser rslsync media

sudo mkdir /etc/systemd/system/resilio-sync.service.d

sudo echo -e "[Service]\nGroup=media" | sudo tee /etc/systemd/system/resilio-sync.service.d/override.conf

sudo systemctl enable resilio-sync.service

sudo systemctl start resilio-sync.service
Now browse to https://yourdomain.com/rslsync
Fill in a username and click Create Identity.
Click the Add Folder button:

Browse to your watch directory. In our example it is /data/torrent/watch/. Then click the Open button.
Now click the 3 dots menu next to the folder and click Preferences:
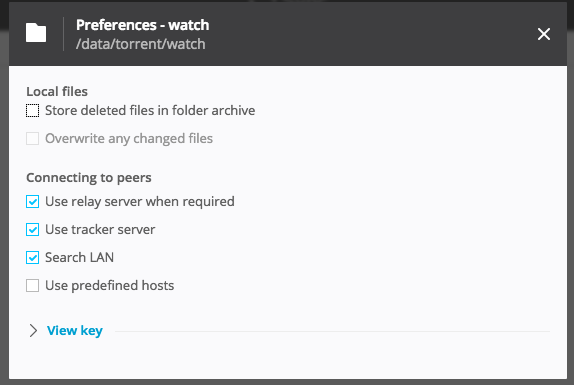
Configure it how you want. This is how I have mine configured.
Now you can click the Share button and use the Key to add your Desktop client or the QR code to add the mobile client.
When you download a torrent click the Open in > Copy to Sync option and then the Sync app will launch.
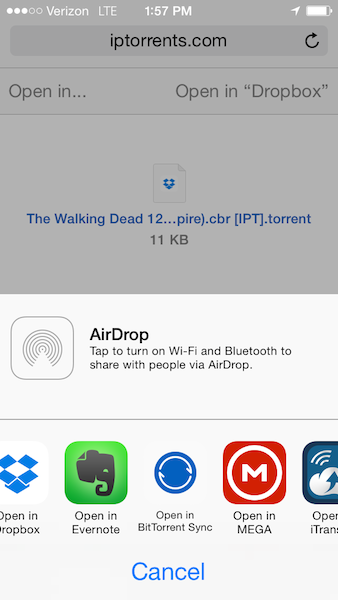
Just browse to the correct watch folder, based on the category of torrent, and then it will sync back to your Ubuntu server and be picked up and started immediately by ruTorrent and receive the correct label based on the folder you placed it in.
In order to view all your media you will want to use a media server. My media server of choice is Plex and we can run Plex Media Server right on our Ubuntu box that contains all our media. There is a script by mrworf that will download and install the latest version of Plex. We will set up that script and use it to install Plex Media Server.
cd /opt/

sudo git clone https://github.com/mrworf/plexupdate.git

sudo wget https://raw.github.com/xombiemp/ultimate-torrent-setup/master/update-plexmediaserver -P /usr/local/bin/

sudo wget https://raw.github.com/xombiemp/ultimate-torrent-setup/master/plexupdate.conf -P /opt/plexupdate/

sudo chmod +x /usr/local/bin/update-plexmediaserver

sudo mkdir /etc/systemd/system/plexmediaserver.service.d

sudo echo -e "[Service]\nGroup=media\nUMask=0002" | sudo tee /etc/systemd/system/plexmediaserver.service.d/override.conf
Edit /opt/plexupdate/plexupdate.conf Change EMAIL and PASSWORD to your credentials for http://plex.tv. If you don't have credentials yet, then create them now.
If you don't have a Plex Pass, then edit /usr/local/bin/update-plexmediaserver and add a -p argument to the command so that it will download the public version. I would suggest purchasing a Plex Pass.
Now you can run the following to install Plex Media Server. Run it again in the future to update to the latest version.
sudo update-plexmediaserver

sudo adduser plex media
From a computer on the same network as your Ubuntu server, browse to http://ubnutu.server.local.ip:32400/web and agree to the ToS.
If your Ubuntu server is on a different network (in the cloud for example), you'll first need to set up an SSH tunnel so that you can access things as if they were local. This is only necessary for the initial setup.
Follow the instructions here at the bottom of the page where it says "On a Different Network" to set up the ssh tunnel.
images/plex/tos.png
Login with your Plex credentials.

Name the server and click Next.

Click Add Library.

Click Moves and click Next.
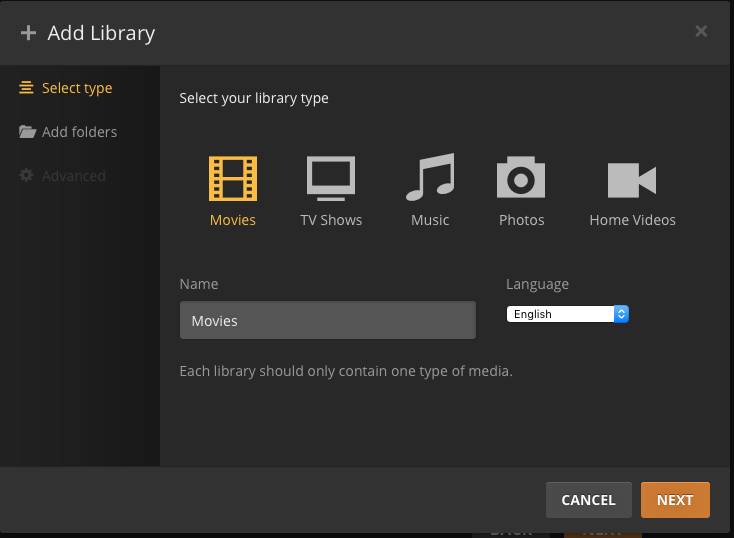
Browse to your Movies folder. In our example it was /data/Media/Movies

Click Add Library again and select TV Shows.

Browse to your TV Shows folder. In our example it was /data/Media/TV Shows

Click Next and then click Done.

Click the settings button in the top right and click the Server section. Click on the Library tab. Enable Update my library automatically. Enable thumbnail generation when media is added.

Click on Scheduled Tasks and enable all the tasks.

Edit any other settings you might want then restart Plex Media Server.
sudo service plexmediaserver restart
Now that Plex Media Server is running you can access your media using one of the Plex clients and stream your media where ever you want! Plex will attempt to use UPnP to automatically configure your firewall to allow access remotly. If your router/firewall does not support that, you will need to manually open port 32400. Then in the Server settings enable Manually specify public port in the Remote Access settings.
To be able to access your resources remotely and secured with an SSL certificate, you will need to set up a domain name. You'll need to purchase a domain name from a registrar and then configure the DNS records to point to your IP address. Most often, with residential ISP accounts, you will have a dynamic IP address that changes often. In order to configure a domain name to point to your IP address you will need to use a dynamic dns service that will update your DNS records whenever your IP address changes. The registrar I chose, Namecheap, is inexpensive and also includes a free dynamic dns service. In this section I'll show you how to purchase your domain name and configure the dynamic dns client to run on the Ubuntu machine.
Browse to https://www.namecheap.com and search for a domain name you want in the search box. Once you find a domain you want that is available, continue on to purchase the domain name.
Once you have your domain name purchased, follow the instructions here to enable Dynamic DNS on your account and get your Dynamic DNS Password. Then follow the instructions here to create the host record that will be updated dynamically.
Now we'll install the dynamic DNS client on the Ubuntu machine. Just accept all the defaults for the ddclient installation.
sudo apt install -y ddclient

sudo wget https://raw.github.com/xombiemp/ultimate-torrent-setup/master/ddclient.conf -O /etc/ddclient.conf
Edit /etc/ddclient.conf
Change the login and password fields to be your domain name and your Dynamic DNS Password that we got earlier. For more information on this config file, check out this Knowlagebase Article.
sudo service ddclient restart
The dynamic dns client should be working now and will automatically update your DNS records whenever your IP address changes. Check your DNS records in Namecheap to make sure that it has automatically added a DNS record.