-
-
Notifications
You must be signed in to change notification settings - Fork 83
Plugin Options Dialog
The Set options dialog is in Lightroom under File ⇢ Plug-in Extras ⇢ MIDI2LR ⇢ Set options. There are five main tabs: Paste Selections, Profiles, Library filter, Other settings, and Series of commands. Changes made in this dialog will be discarded if you press the cancel button.
Note that Presets have been moved to their own, separate, dialog. This saves time opening dialogs and reduces overall dialog box size, which was an issue with small screens.

The Paste selections dialog allows you to specify which settings will be pasted using the Paste Selected Settings action. Only those settings with a check mark will be pasted. Others (blank or colored-in) will not. The clear all button unchecks all boxes, the set all button checks all boxes.
Checking Ask each time will cause the Paste selections dialog to pop up whenever executing a Paste Selected Settings action. This allows you to customize the selections for each paste. By design, changes made in the pop up will not be saved to disk, as this may represent temporary preferences. Only changes made in the Options dialog will be saved. If you want to save a set of settings for Paste selections, open it up in the Options dialog then press ok.
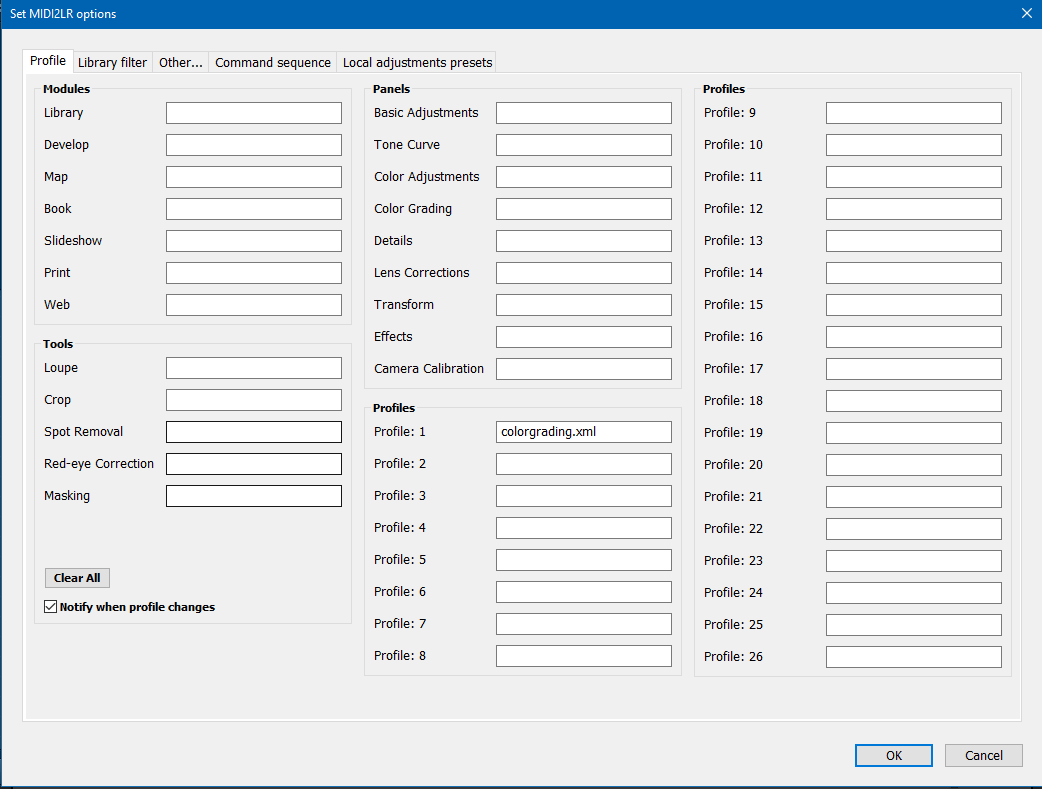
The Profiles tab allows you to assign control-map profiles for the MIDI2LR app. Please review the wiki's Profiles page for more information on how the program will behave when Profiles are used. There are three types of profile changes:
- You press a button assigned to a profile action, such as Profile 1.
- You change to a different module or develop tool, either through an action on your MIDI controller, or directly in Lightroom.
- You change to a different develop panel by pressing a button or adjusting a value on your MIDI controller. Lightroom doesn't provide information about which panel is currently active, so the application will not be able to detect any changes you make directly in Lightroom.
All profile files need to be in the same directory. If you want to assign the file MIDI2LRProfA.xml to Profile 1, you would type MIDI2LRProfA.xml in the box to the right of Profile 1. The dialog box is aware of the .xml files in your current profile directory, and will assist in completing the file's name. You can always add a file name that isn't currently in the directory by ignoring the autocomplete suggestions, but will need to have the file in the proper location when using it later.
Selecting the Notify when profile changes checkbox will cause Lightroom to show a brief notification in part of its window when the profile changes.
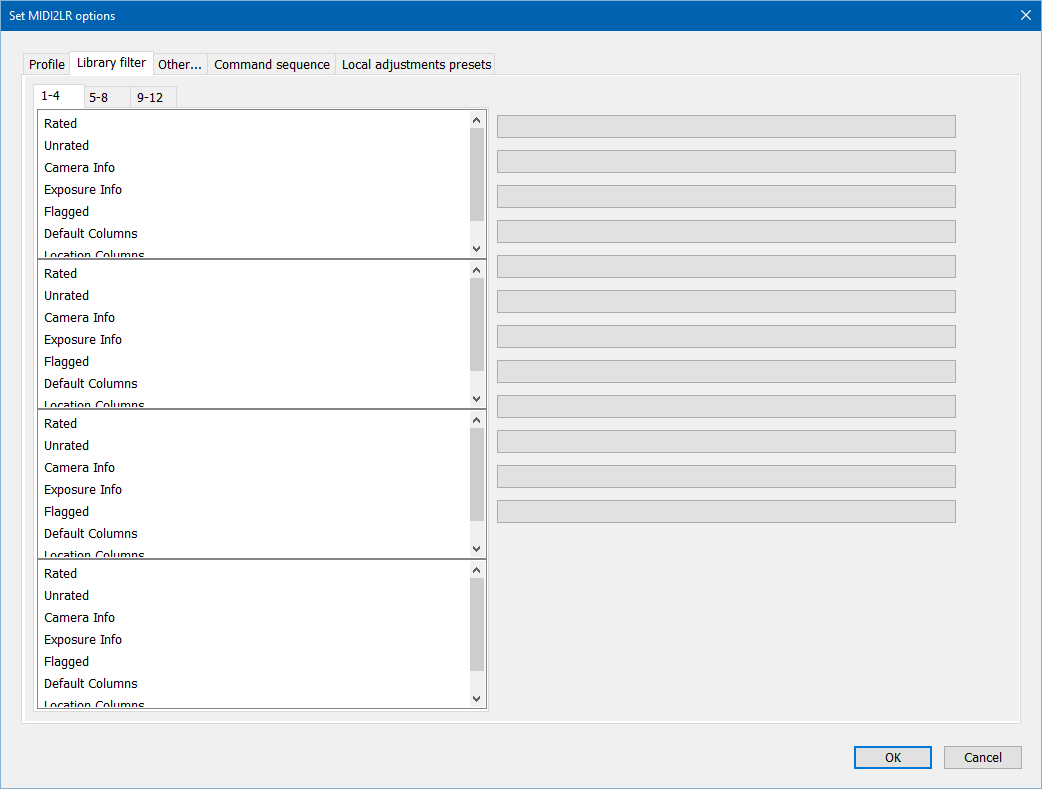
The Library filter tab allows you to assign predefined library filters for the MIDI2LR app. These are assigned just like presets are, and are triggered when you press a MIDI button mapped to that filter number. So, if your first filter is hide rejected, then a button assigned to Filter 1 will change the library filter to hide rejected.
Just like with presets, clicking on a Selected filter box will clear that filter.
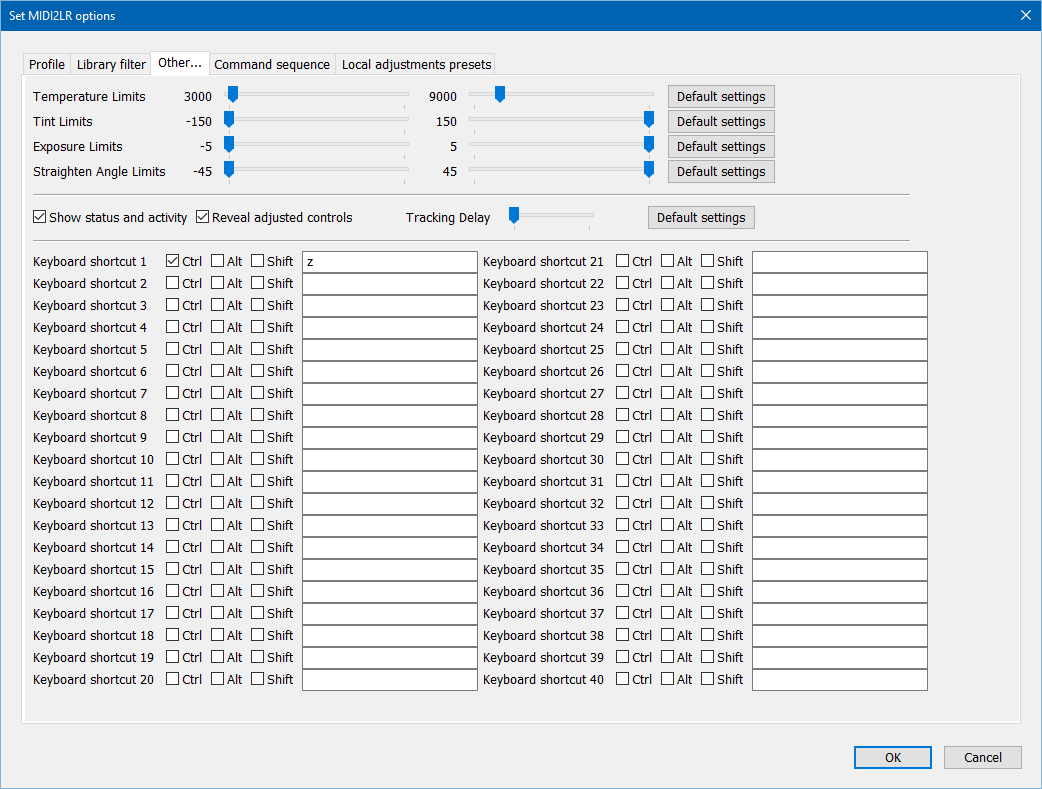
The Other settings tab, surprisingly enough, accesses other settings. Currently, there are settings for limits, a checkbox for show status and activity, reveal adjusted controls checkbox, tracking delay control, and shortcut key assignments. Note that the Stop Server option in the screenshot has been removed in version 2.1.0.0.
Limits allows you to reduce the total range a control can be moved to allow for finer adjustments. For example, most people would not use the broad Temperature range (all the way to 50000 for digital negatives and HDR images), so restricting it is worthwhile. Control limits are complex, in part because different types of images have different parameter ranges, so we cannot set universal limits for all pictures. Rather we set specific limits for parameters based on the current control range.
Moving the sliders will change the minimum and maximum limits for each parameter. Fine changes can be made with the left and right arrow keys, coarser changes by holding the shift key down while using the arrow keys. If you accidentally make the minimum greater than the maximum, the program will simply swap the two when you save it. Reset to defaults sets the limits to the program defaults.
Note that the range for a given parameter varies according to what type of image you are working with, such as jpg, DNG, or HDR. Because range does vary, the limits dialog will sense the ranges applicable to the currently-selected photo and display that for adjustment. If no photo is selected or you are not in the Develop module, the limits options will be hidden, since the program will be unable to identify the appropriate range.
If you change to a different type of photo, only previously-set parameter limits that are still applicable will be used. To adjust other parameters, return to the limits section of the dialog. For example, an HDR photo has an exposure range of -10 to +10 and a Temperature range of 2000 to 50000, while a DNG has an exposure range of -5 to +5 and a Temperature range of 2000 to 50000. Since the range for Temperature is identical, adjusting the limits for a DNG will also adjust the limits for an HDR image. Conversely, adjusting the exposure range only affects the DNG range. If you switch to an HDR image, the exposure limits will change to whatever you have set up for HDR images, or -10 to +10 if no limits have been set for that mode.
I've poked around a little, and found that at least the following are available ranges, depending upon the quality of the file. Note that png, tiff, jpg and dng files all can have different ranges—the file extension only tells part of the story. Ranges I've found with some of my files:
| Parameter | DNG | PNG TIFF JPG | PNG TIFF JPG | HDR DNG made by LR |
|---|---|---|---|---|
| Temperature | 2000 50000 | -100 100 | -100 100 | 2000 50000 |
| Tint | -150 150 | -100 100 | -100 100 | -150 150 |
| Exposure | -5 5 | -4 4 | -5 5 | -10 10 |
| Contrast | -100 100 | -50 100 | -100 100 | -100 100 |
| Saturation | -100 100 | -100 100 | -100 100 | -100 100 |
| Clarity | -100 100 | -100 100 | -100 100 | -100 100 |
For Temperature and Tint, DNGs will have one set of limits since all DNGs tested had the same range limits, PNG/TIFF/JPG files another since they all shared range limits different than that for DNGs. For Exposure, there are three sets of limits: one for HDR DNG files, one for DNG or high-bit depth PNG/TIFF/JPG files, and one for other PNG/TIFF/JPG files.
All files tested will share the same Contrast limit, because MIDI2LR only looks at the upper end of the range to see which limits should apply. I'm a bit surprised by contrast having a range change only at the lower end, but will not change the program's behavior unless this becomes a big issue, as I may then have to track down the behaviors for all of the possible controls.
Whenever you're in doubt about whether a particular type of image has the appropriate ranges set, just open up the Options dialog and take a look.
The limits dialog defaults to showing only Temperature, Tint, Exposure and Straighten Angle. It is very easy to experiment with other parameter limits as well. First, on the Limits: Available Parameters page of the wiki, find the adjustment for which you want to set limits. Copy down the exact spelling and capitalization of the control. Then, using a text editor, open up Limits.lua from the plugin directory. Mac users need to open up the MIDI2LR.lrplugin package to get to the Limits.lua file (right click or control click on MIDI2LR.lrplugin). Near the top of the file you will see the following code:
--hidden
local DisplayOrder           = {'Temperature','Tint','Exposure','straightenAngle'}
Add an adjustment by placing a comma immediately after 'straightenAngle' then typing the name of the adjustment enclosed in quote marks. You can add as many parameters as you wish. Just remember to have a comma between each item and quote marks around each name. The closing } comes after the last limit. The order of limit controls in the dialog box will be controlled by the order of the words in this list. Save the file, close and restart Lightroom, and your new set of limits should be active. Please contact me if any of these other adjustment limits are particularly useful, as we can include them in subsequent releases.
For example, if you wanted to add Vibrance limits, the lines in Limits.lua after editing would be:
--hidden
local DisplayOrder = {'Temperature','Tint','Exposure','straightenAngle','Vibrance'}If you enable the Show Status and Activity checkbox, each time you adjust a slider or knob, the name of the control and the current value will be temporarily displayed on the Lightroom Screen in a small overlay of the picture. If the control is being ignored because Pickup Mode is enabled and the control is too far from the current setting, the current setting will also be displayed, to the right of the control value. This makes it easier to see which direction the control has to be moved to enable pickup.
Adobe made a mistake when adding the Transform panel. If Reveal adjusted controls is checked, when adjusting Transform controls, the Lens Corrections panel will open instead. Formerly, MIDI2LR always was set to reveal adjusted controls, but with this bug, LR's behavior can be annoying. One solution is to uncheck Reveal adjusted controls and check Show status and activity. This way, a translucent bezel will appear briefly over the photo after each develop value change and will help you track your adjustments.
This controls how long LR waits before committing changes you have made with MIDI2LR controls. The shorter the delay, the more history entries there will be, which may be a good thing or a bad thing. I recommend leaving it at the default setting unless you have particular issues with how history is being recorded. One reason to shorten it is if you are having trouble editing photos that are synced to Lightroom Mobile. Lightroom will "snap back" to the basic develop settings if you make a basic change and another change before the tracking delay expires. Separating the two actions in the history by having a shorter delay fixes that weird issue. The Default settings button will reset the tracking delay to the program's default.
This allows you to assign custom keyboard shortcuts to commands Key 1 through Key 40. In any module, you can display module shortcuts by going to the LR help menu. The Lightroom Queen has an excellent listing of shortcuts (for English keyboards).
Be aware that the program also detects the shift keys used to put the character in the box. So if you enter E, it will add a shift to the e. Use lower-case letters unless you intend to add the shift.
Function keys are entered in the box as f plus the number of the function, such as f3. Special keys are entered in the box as follows (don't enter the text in parentheses; it just indicates what the resulting key is named in OS X):
backspace (OSX delete)
cursor down
cursor left
cursor right
cursor up
delete (OSX delete right)
end
escape
home
numpad 0
numpad 1
numpad 2
numpad 3
numpad 4
numpad 5
numpad 6
numpad 7
numpad 8
numpad 9
numpad add
numpad decimal
numpad divide
numpad multiply
numpad subtract
page down
page up
return
space
tab
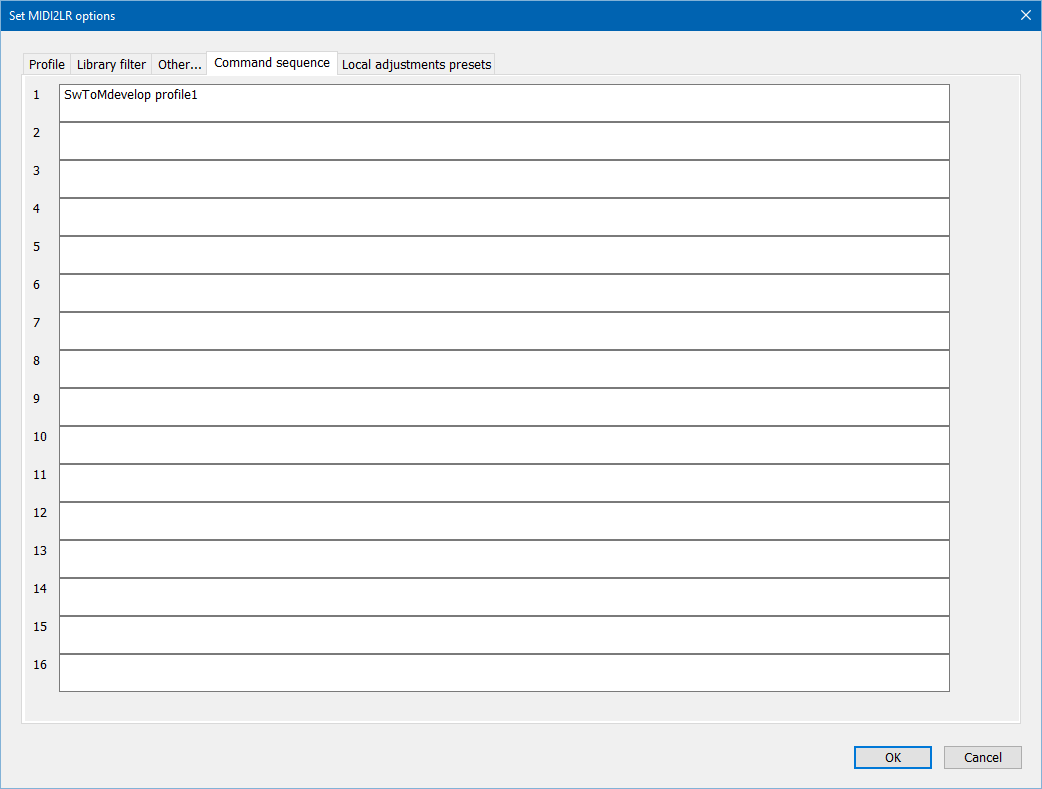
In this dialog, you can set up a series of commands to execute with one button press. There are nine command sets you can program. In the app, these are located under the General tab of the command assignment dialog, as Series of Commands 1 through 9.
To set this up, first identify the command abbreviations you want to use. These are documented in the Commands wiki page. Then, in the dialog, in the slot number you want to use for this set, type in the list of commands, each separated by a space or comma. Extra spaces are ignored, so format this as you wish. Then, in the app, assign the same number to a button. For example, if you use slot 1 in the dialog, assign Series of commands 1 to a button.
Note that only commands that are for buttons are supported. Look for button on the Commands wiki page.
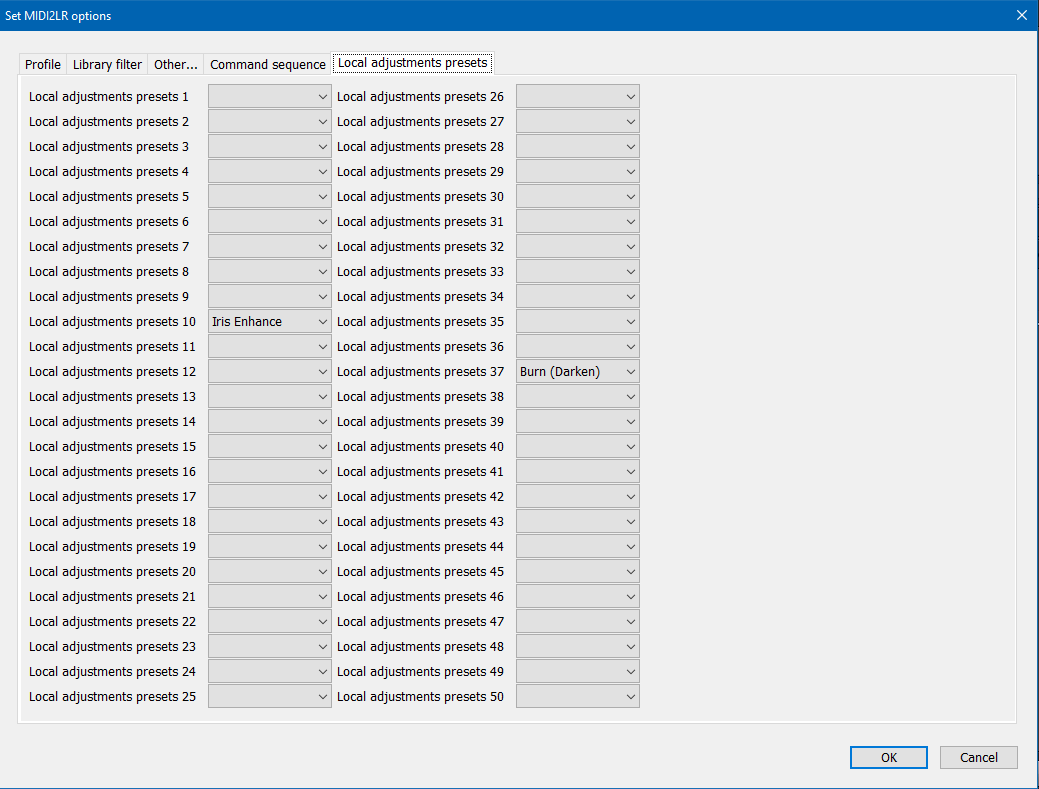
In this dialog you can assign local adjustment presets to be applied with one button press. in the app, these are localted under the Local Adjustments tab of the command assignment dialog, as Local Adjustments Preset 1 through 8.
To set this up, first identify the file name of the local adjustment preset you want to use. Then, in the dialog, in the slot number you want to use for this preset, type in the filename. You can leave off the .lrtemplate extension if you wish. The name typed in the box must be an exact match to the file's name.
After saving those assignments, go to the app and assign the corresponding Local Adjustments Preset to a button.
For any wiki edits or corrections, or if you are having problems with the application or have suggestions for improvement, post a new discussion online in our discussion forum.