We read every piece of feedback, and take your input very seriously.
To see all available qualifiers, see our documentation.
Have a question about this project? Sign up for a free GitHub account to open an issue and contact its maintainers and the community.
By clicking “Sign up for GitHub”, you agree to our terms of service and privacy statement. We’ll occasionally send you account related emails.
Already on GitHub? Sign in to your account
本篇记录MongoDB高可用模式部署步骤,其他部署方式见上一篇。
首先准备机器,我这里是在公司云平台创建了三台DB server,ip分别是10.199.144.84,10.199.144.89,10.199.144.90。
分别安装mongodb最新稳定版本:
wget https://fastdl.mongodb.org/linux/mongodb-linux-x86_64-2.4.12.tgz
tar -xzvf mongodb-linux-x86_64-2.4.12.tgz
mv mongodb-linux-x86_64-2.4.12 /usr/lib
做个软连接或者按照官方的做法把mongo shell都添加到环境变量:
ln -s /usr/lib/mongodb-linux-x86_64-2.4.12/bin/mongo /usr/bin/mongo
ln -s /usr/lib/mongodb-linux-x86_64-2.4.12/bin/mongos /usr/bin/mongos
ln -s /usr/lib/mongodb-linux-x86_64-2.4.12/bin/mongod /usr/bin/mongod
分别创建存储数据的目录:
mkdir -p /data/mongodb && cd /data/mongodb/ && mkdir -p conf/data conf/log mongos/log shard{1..3}/data shard{1..3}/log
分别配置启动config服务器:
mongod --configsvr --dbpath /data/mongodb/conf/data --port 27100 --logpath /data/mongodb/conf/confdb.log --fork --directoryperdb
确保config服务都启动之后,启动路由服务器(mongos):
mongos --configdb 10.199.144.84:27100,10.199.144.89:27100,10.199.144.90:27100 --port 27000 --logpath /data/mongodb/mongos/mongos.log --fork
分别配置启动各个分片副本集,这里副本集名分别叫shard1,shard2,shard3:
shard1
shard2
shard3
mongod --shardsvr --replSet shard1 --port 27001 --dbpath /data/mongodb/shard1/data --logpath /data/mongodb/shard1/log/shard1.log --directoryperdb --fork

mongod --shardsvr --replSet shard2 --port 27002 --dbpath /data/mongodb/shard2/data --logpath /data/mongodb/shard2/log/shard2.log --directoryperdb --fork

mongod --shardsvr --replSet shard3 --port 27003 --dbpath /data/mongodb/shard3/data --logpath /data/mongodb/shard3/log/shard3.log --directoryperdb --fork
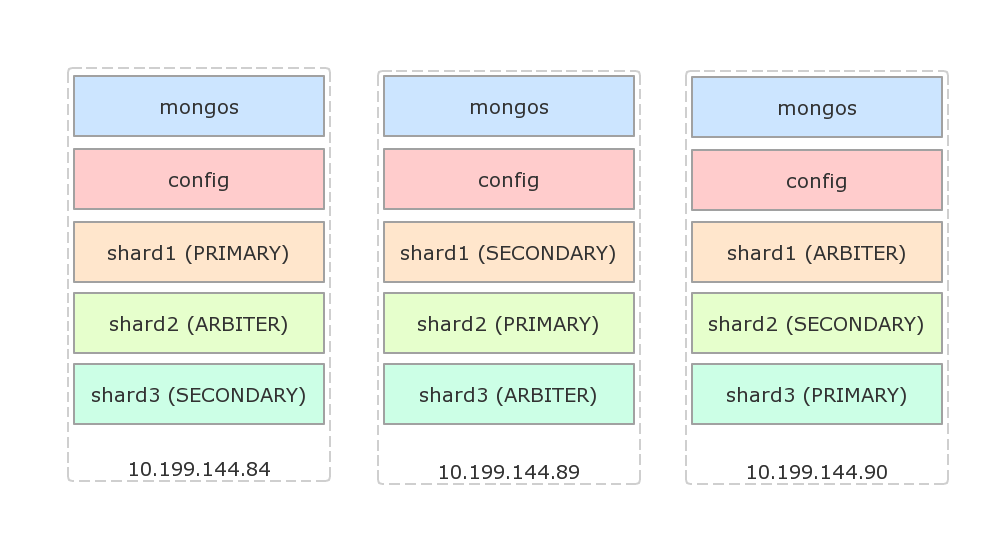
接下来配置副本集,假设使用如下的架构,每台物理机都有一个主节点,一个副本节点和一个仲裁节点:
配置shard1(登陆84,没有显式指定主节点时,会选择登陆的机器为主节点):
mongo --port 27001
use admin
rs.initiate({
    _id: 'shard1',
    members: [
        {_id: 84, host: '10.199.144.84:27001'},
        {_id: 89, host: '10.199.144.89:27001'},
        {_id: 90, host: '10.199.144.90:27001', arbiterOnly: true}
    ]
});
配置shard2(登陆89):
mongo --port 27001
use admin
rs.initiate({
    _id: 'shard2',
    members: [
        {_id: 84, host: '10.199.144.84:27002', arbiterOnly: true},
        {_id: 89, host: '10.199.144.89:27002'},
        {_id: 90, host: '10.199.144.90:27002'}
    ]
});
配置shard3(登陆90):
mongo --port 27001
use admin
rs.initiate({
    _id: 'shard3',
    members: [
        {_id: 84, host: '10.199.144.84:27002'},
        {_id: 89, host: '10.199.144.89:27002', arbiterOnly: true},
        {_id: 90, host: '10.199.144.90:27002'}
    ]
});
下面设置路由到分片集群配置,随便登陆一台机器,假设是84:
mongo --port 27000
use admin
db.runCommand({addShard: 'shard1/10.199.144.84:27001,10.199.144.89:27001,10.199.144.90:27001'});
db.runCommand({addShard: 'shard2/10.199.144.84:27002,10.199.144.89:27002,10.199.144.90:27002'});
db.runCommand({addShard: 'shard3/10.199.144.84:27003,10.199.144.89:27003,10.199.144.90:27003'});
查看配置好的shard:
mongo --port 27000
use admin
db.runCommand({listshards: 1});
结果:
{
    "shards" : [
        {
            "_id" : "shard1",
            "host" : "shard1/10.199.144.84:27001,10.199.144.89:27001"
        },
        {
            "_id" : "shard2",
            "host" : "shard2/10.199.144.89:27002,10.199.144.90:27002"
        },
        {
            "_id" : "shard3",
            "host" : "shard3/10.199.144.90:27003,10.199.144.84:27003"
        }
    ],
    "ok" : 1
}
其中仲裁(ARBITER)节点没有列出来。
下面测试分片:
mongo --port 27000
use admin
db.runCommand({enablesharding: 'dbtest'});
db.runCommand({shardcollection: 'dbtest.coll1', key: {id: 1}});
use dbtest;
for(var i=0; i<10000; i++) db.coll1.insert({id: i, s: 'str_' + i});
如果dbtest已经存在,需要确保它已经以id建立了索引!
id
过上一段时间之后,运行db.coll1.stats()显式分片状态:
db.coll1.stats()
{
    "sharded" : true,
    "ns" : "dbtest.coll1",
    "count" : 10000,
    ...
    "shards" : {
        "shard1" : {
            "ns" : "dbtest.coll1",
            "count" : 0,
            "size" : 0,
            ...
        },
        "shard2" : {
            "ns" : "dbtest.coll1",
            "count" : 10000,
            "size" : 559200,
            ...
        }
    }
    ...
}
可以看到,这里分片已经生效,只是分配不均匀,所有的数据都存在了shard2中了。分片key的选择策略可以参考官方文档。在2.4版本中,使用hashed shard key算法保证文档均匀分布:
mongo --port 27000
use admin
sh.shardCollection('dbtest.coll1', {id: 'hashed'});
使用hashed算法之后,做同样的测试,插入的数据基本均匀分布:
{
    "sharded" : true,
    "ns" : "dbtest.coll1",
    "count" : 10000,
    ...
    "shards" : {
        "shard1" : {
            "ns" : "dbtest.coll1",
            "count" : 3285,
            "size" : 183672,
            ...
        },
        "shard2" : {
            "ns" : "dbtest.coll1",
            "count" : 3349,
            "size" : 187360,
            ...
        },
        "shard3" : {
            "ns" : "dbtest.coll1",
            "count" : 3366,
            "size" : 188168,
            ...
        }
    }
}
更多资料,请参考MongoDB Sharding。
在应用程序里,使用MongoClient创建db连接:
MongoClient
MongoClient.connect('mongodb://10.199.144.84:27000,10.199.144.89:27000,10.199.144.90:27000/dbtest?w=1', function(err, db) {
    ;
});
The text was updated successfully, but these errors were encountered:
No branches or pull requests
本篇记录MongoDB高可用模式部署步骤,其他部署方式见上一篇。
首先准备机器,我这里是在公司云平台创建了三台DB server,ip分别是10.199.144.84,10.199.144.89,10.199.144.90。
分别安装mongodb最新稳定版本:
做个软连接或者按照官方的做法把mongo shell都添加到环境变量:
分别创建存储数据的目录:
分别配置启动config服务器:
确保config服务都启动之后,启动路由服务器(mongos):
分别配置启动各个分片副本集,这里副本集名分别叫
shard1,shard2,shard3:接下来配置副本集,假设使用如下的架构,每台物理机都有一个主节点,一个副本节点和一个仲裁节点:

配置shard1(登陆84,没有显式指定主节点时,会选择登陆的机器为主节点):
mongo --port 27001 use admin rs.initiate({ _id: 'shard1', members: [ {_id: 84, host: '10.199.144.84:27001'}, {_id: 89, host: '10.199.144.89:27001'}, {_id: 90, host: '10.199.144.90:27001', arbiterOnly: true} ] });配置shard2(登陆89):
mongo --port 27001 use admin rs.initiate({ _id: 'shard2', members: [ {_id: 84, host: '10.199.144.84:27002', arbiterOnly: true}, {_id: 89, host: '10.199.144.89:27002'}, {_id: 90, host: '10.199.144.90:27002'} ] });配置shard3(登陆90):
mongo --port 27001 use admin rs.initiate({ _id: 'shard3', members: [ {_id: 84, host: '10.199.144.84:27002'}, {_id: 89, host: '10.199.144.89:27002', arbiterOnly: true}, {_id: 90, host: '10.199.144.90:27002'} ] });下面设置路由到分片集群配置,随便登陆一台机器,假设是84:
mongo --port 27000 use admin db.runCommand({addShard: 'shard1/10.199.144.84:27001,10.199.144.89:27001,10.199.144.90:27001'}); db.runCommand({addShard: 'shard2/10.199.144.84:27002,10.199.144.89:27002,10.199.144.90:27002'}); db.runCommand({addShard: 'shard3/10.199.144.84:27003,10.199.144.89:27003,10.199.144.90:27003'});查看配置好的shard:
mongo --port 27000 use admin db.runCommand({listshards: 1});结果:
{ "shards" : [ { "_id" : "shard1", "host" : "shard1/10.199.144.84:27001,10.199.144.89:27001" }, { "_id" : "shard2", "host" : "shard2/10.199.144.89:27002,10.199.144.90:27002" }, { "_id" : "shard3", "host" : "shard3/10.199.144.90:27003,10.199.144.84:27003" } ], "ok" : 1 }其中仲裁(ARBITER)节点没有列出来。
下面测试分片:
mongo --port 27000 use admin db.runCommand({enablesharding: 'dbtest'}); db.runCommand({shardcollection: 'dbtest.coll1', key: {id: 1}}); use dbtest; for(var i=0; i<10000; i++) db.coll1.insert({id: i, s: 'str_' + i});如果dbtest已经存在,需要确保它已经以
id建立了索引!过上一段时间之后,运行
db.coll1.stats()显式分片状态:{ "sharded" : true, "ns" : "dbtest.coll1", "count" : 10000, ... "shards" : { "shard1" : { "ns" : "dbtest.coll1", "count" : 0, "size" : 0, ... }, "shard2" : { "ns" : "dbtest.coll1", "count" : 10000, "size" : 559200, ... } } ... }可以看到,这里分片已经生效,只是分配不均匀,所有的数据都存在了shard2中了。分片key的选择策略可以参考官方文档。在2.4版本中,使用hashed shard key算法保证文档均匀分布:
使用hashed算法之后,做同样的测试,插入的数据基本均匀分布:
{ "sharded" : true, "ns" : "dbtest.coll1", "count" : 10000, ... "shards" : { "shard1" : { "ns" : "dbtest.coll1", "count" : 3285, "size" : 183672, ... }, "shard2" : { "ns" : "dbtest.coll1", "count" : 3349, "size" : 187360, ... }, "shard3" : { "ns" : "dbtest.coll1", "count" : 3366, "size" : 188168, ... } } }更多资料,请参考MongoDB Sharding。
在应用程序里,使用
MongoClient创建db连接:The text was updated successfully, but these errors were encountered: