forked from apigrove/apigrove
-
Notifications
You must be signed in to change notification settings - Fork 1
apigrove GUI API IP Whitelist authentication
Bradley Wangia edited this page Sep 28, 2012
·
2 revisions
This apiGrove tutorial demonstrates how to use an IP Whitelist to restrict access your API.
Please ensure the following prerequites are met
- A working install of apiGrove and apiGroveGUI
- A web browser
- Open your installed apiGrove GUI url in a browser
- Login to apiGroveGUI /dev/images/apiGroveGUI_Login.png
- Click on API in the top menu
- Click Create New

- Enter a Name for your API 'myWhitelistTweets'
- Enter an Endpoint
- Enter the target host where this API is hosted
- Click Advanced button /dev/images/apiGroveGUI_APIWhitelist.png
- Click The Enabled button (makes your API active immediately upon creation)
- Click the ‘Whitelist’ button for Authenitcation Type
- Leave the HTTPS button unclicked
- Enter 9 for the Transactions Per Second (TPS) Threshold
- Enter 10 for the Transactions Per Minute (TPM) Threshold
- Select the GET button for allowed HTTP calls
- Click Save

- apiGrove GUI returns a success message and lists your onboarded API
- Click on Auth in the top menu
- Click Create New

- Enter an ID 'whitelisttwitter' for this auth
- Enter a comma separated list of IP (be sure to include your IP for testing!)
- Click Save

- 'whitelisttwitter' is displayed in a listing of your auths
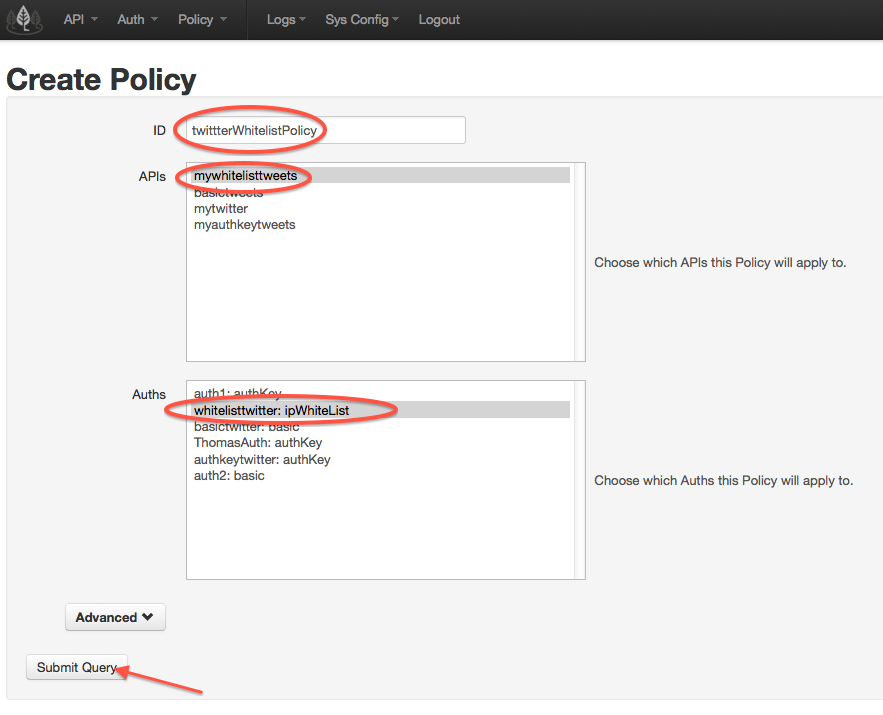
The policy associates the auth with your API.
- Click on Policy in the top menu
- Click Create New

- Enter ID twittterWhitelistPolicy
- Select the API created in earlier steps
- Select the Auth created
- Click submit query

- Attempting to access the API from an IP not on the whitelist returns a unauthorized message (remove your API from the whitelist for this test)
- Accessing the API with the correct username and password returns search results from the twitter API