-
Notifications
You must be signed in to change notification settings - Fork 3
How to use
To run LabPype, simply type the command:
python -m labpype.__init__
LabPype will create a folder .labpype in your home directory as the workspace for settings file and downloaded/installed widget sets.
If you don't want the terminal to show up, you can run LabPype with pythonw. For example, on Windows, create a shortcut and type in the following command for target:
pythonw.exe -m labpype.__init__
LabPype allows you to have multiple instances of LabPype that each has its own workspace. This way, each instance can have its own installed widget sets and program settings.
For example, if you want to run LabPype in a folder called cloning, create a pyw file in the folder and add the following:
import os
import labpype
App = labpype.App(path=os.path.dirname(os.path.realpath(__file__)))
App.Start()
Then run the pyw file. You will see several files and folders are created in this folder.

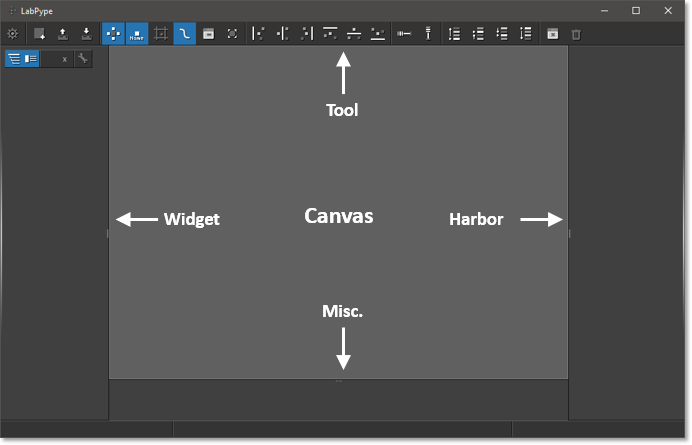
- Canvas - where you draw the pipeline and interact with the widgets.
- Tool - basic functions such as load & save, and function for organizing the canvas.
- Widget - where you find all the widgets you have installed.
- Harbor - dialogs that are docked appear here
- Misc. - for now, it only logs the result of tasks. (More features are coming)
At this point, we do not have any widgets installed. To get started, we will download a toy widget set in the next section.
These files are:
ToyWidgetSet.zip - The toy widget set
demo.pa - A project save file that contains both the scheme and data
demo.pas - A scheme save file that contains only scheme
demo.py - A shortcut for you to start LabPype easily
Let's put all these files in a folder called demo, then start LabPype:
cd demo
python demo.py
Click this button in the widget panel to invoke the widget manage dialog: